Archive
Up board, a perfect embedded board
In my previous article about the UP single board computer, my primary focus was to use it purely for emulating a next generation PPC based Amiga, running Amiga OS 4.1 final edition. This is probably the hardest, most challenging task you can give a computer. Even by modern standards emulating a 68k and ppc based hybrid platform is a proverbial assault on the hardware.

Next generation Amiga, it works but the board is not powerful enough to deliver an enjoyable experience. Classic Amiga’s however is the best you can imagine!
Just contemplate it for a second: if ppc emulation isnt formidable enough, the target of my emulation was a hybrid platform in the true sense of the word. You have the older Amiga chipset which is extremely complex. Attached to that (and working in symphony) is a ppc accelerator board designed to do the grunt work.
The UP single board computer came up short for that highly specialized task. But like I wrote, it missed the mark by just a handful of Hz. Had the CPU been just slightly more powerful (and a more suitable storage device), the UP board would have ace’ed it. Which would have been nothing short of miraculous! The fact that it was capable of running Amiga OS 4 at working speed to begin with is extremely impressive! Remember this is a tiny, single board computer retailing at $150 !
And the most amazing part? The CPU emulated the next generation Amiga running at a steady 60% cpu utilization. Not once did it spike up to 100%. So the Windows process scheduler held it back for obvious reasons.
Ok, but what about other tasks?
Just because you don’t have the power to knock out Mike Tyson doesn’t necessarily mean you’re a bad fighter. And the same can be said about technology and computers. The UP board came up a little short for next generation Amiga emulation, but so what? The PC I owned back in 2013 and had been using for Delphi development for 3 years couldn’t even start OS 4 of its life depended on it.
Truth be told, the UP board is the most exciting product I have owned for years. I was only this excited about something when I got my first Raspberry PI. I’m even more excited about the UP board because it’s infinitely more capable!

x86 UP board, same size as the PI3 but packing a hell of a punch!
And when I get excited, you should to. I am privileged and blessed through my work to have access to all the latest gadgets. Be it embedded boards to the latest phones, tablets, graphics cards, operative systems — you name it, I got it or have access to it. But of all the awesome tech I have played with since 2010, the UP board is the most fun. It’s just perfect and has everything a professional software developer, retrogamer or product integrator could possibly want in a SoC.
Setting up the UP board
The first thing you want to do is get Windows 10 installed. If Linux is your thing then I can strongly recommend Ubuntu, it’s beautiful on the UP and runs like a dream.
But for this article I’ll be going with Windows 10, and the easiest way to get that installed, unless you have an external DVD drive and bootable disks is the following:
- Have a USB stick with at least 4 gigabyte
- Download Rufus
- Download the Windows 10 iso file from Microsoft
- Burn the Windows iso file to the USB stick
- Plug the USB stick into the UP board and fire it up
Rufus is a cool little program that allows you to burn ISO files to a USB stick and then make the stick bootable. This is not the same as (for example) Windows image writer, which just burns a disk image (*.img file) verbatim to whatever storage media you pick.
Once you have burnt the ISO to your usb stick, it’s just a matter of sticking it into one of the free usb-slots on the device and power it up. The normal Windows installer should show up as normal and you just follow the installation process. I’m guessing you have done this a few times in your life, so no need to outline that part.
Enable remote desktop
Once Windows is installed and registered, you want to give the computer a name that makes a little more sense. Windows comes up with these absurd identifiers based on whatever, like “UPx7621ab” and similar stuff.
I renamed my board to “UPBoard” and checked the “Allow remote connections”. I then added my admin account (the “select users” button) so I can login remotely. If you havent done this before then just google around and you’ll find out how:

You don’t need to set up a full remote desktop (which is something new in Windows 10), you just need to enable remote access
Once you have changed all that you need to reboot the device, so just do that. In the meantime go over to your work PC and download “Microsoft remote desktop preview” which is their new Remote desktop client. Yes, the good old remote desktop application that have shipped with Windows since the civil war is no longer there. So head over to Microsoft and grab the new one.
Connect to the Up-Board from your PC
OK, with that in place I guess it’s time to play! Fire up the remote-desktop application, add a new location, use the name “UPBoard” as the host, then add your login credentials. Click connect and voila! You now have remote access to your fancy new mini computer!

Click “Add” to add your new remote connection
Then just double-click on the icon that says “UPBoard” in the fancy menu, and that’s it! With this in place you don’t even need a monitor or keyboard for the board, just get a nice case for it and plug it into the router. You can even leave it besides your router if you like.

Fast, responsive and one hell of a system to work with!
As a developer I take it for granted that you know how to share out a drive or folder, so I’m not going to pussy feet you through that.
Getting the UP drivers
You really want the UP drivers, this means faster graphics and that Windows knows what it can and cannot do with the hardware. So head over to the UP website and download the drivers. Then just install them one by one.
Click here to visit the download page.
Developing on the board
I do most of my development through VMWare. Since I have to use various versions of Delphi, Xamarin studio, Visual studio and other things I can’t even spell – an ordinary PC just wont cut it. I think the smallest PC I have is a Intel i7 octa-core running at 4.1 GHz with 32 gigabyte memory and NVidia Geforce GTX 970. This is because I run 3 virtual environments at the same time (client, server and database).
But you don’t need specs like that to write Smart Pascal based node.js services or servers. That’s one of the great things about Smart Mobile Studio. A normal PC will do the trick. And the UP board is much smoother to work on than one of my old machines, that’s for damn sure.

$150 for a fully equipped workstation? Indeed! The UP-board performs brilliantly for Smart Mobile Studio development. So you can easily code, test and deploy on the board itself.
When it comes to CPU use that’s really not a problem. I tried it with several custom applications, including the Smart pascal kiosk software. This has a node.js server running in the background providing content, while a webkit browser renders the front-end display. Amazingly the whole thing hardly registers. The system that usually runs at around 60% on the Raspberry PI, here clocks in at a measly 5% (!)

5% performance hit. Holy cow!
Nothing to say except awesome, I absolutely love this board!
EMMC, the only real bottleneck of the product
The only real bottleneck, a topic I exhausted in my previous post because it pissed me off like nothing else, is the storage device.
But it’s not really a big problem under Windows or Ubuntu. You do notice it when you download large files or decompress large archives. In order to get my developer tools over I just zipped them down and transferred it over. And while getting the data from A to B was simple enough – it was when I started unpacking the data I noticed how slow it was.
But here is the thing: on a dedicated product, these things don’t matter. If you are building your own games machine, your own router, or designing a new top of the line NAS destined for mass production – it doesn’t matter if unzipping 2 gigabytes of source code is slow. Because that’s not what your product will be doing anyway.
Your product, what you use the UP board to make, will ship with a custom program (or a series of programs) designed by you. They will be pre-installed on the machine as your customer buys it, and unless you are born in a cave – I hardly think you will be forcing your customers to download gigabytes of data and unpacking it. That would be a horrible design mistake regardless of product.

Classic Amiga emulation is flawless and perfect on the UP board. This is probably the best emulation experience I have ever had
Let’s for sake of argument we say you want to use the board to create the coolest retrogaming machine ever invented. You wont be copying over all the roms every single time right? You will copy it over once, or even better – just download it directly since you have Windows or Ubuntu to play with. So again, the somewhat dull storage device is not going to be a problem for you.
And should you build a movie server or media streaming service, like Plex, then you are going to attach an external hard disk anyway and just use the internal storage for booting up. Once again, not a factor at all.
Factor in a drive
The red thread that you see in the 3 posts I have made about the UP board, is all about the storage device. I have bitched enough about their choice of EMMC storage I think, but instead of just bitching – I want to give you a tip: always factor in a fast USB 3.0 drive when planning a product or home appliance based on the UP single board computer. And that goes double if you plan on developing on the board itself (which it is more than capable of handling).
The CPU and graphics chipset is more than enough to drive Visual Studio, Mono, Delphi, Lazarus or Smart Mobile Studio – but do yourself a favour and reserve the buildt-in EMMC device for Windows only. Never, ever on pain of death install any software bigger than notepad on it because it will bug you for all eternity.
As such I cannot recommend that you buy the biggest model, because the only thing separating the biggest UP model from the second best, is more bloody EMMC storage. The model just below the best is equipped with same amount of ram (4 gigabytes) but only half the disk space. And I so regret not getting that instead. Those $20 would go a long way paying for a plastic casing instead.

Unless you want to run a fixed, single application and could use the extra space, it’s $20 straight down the toilet.
So word to the wise: always factor in a fast USB 3.0 external disk if you plan on using the UP board for anything disk intensive. And with disk intensive I also mean compiling code, because that typically plows through hundreds if not thousands of files. So yeah, the EMMC really sucks.
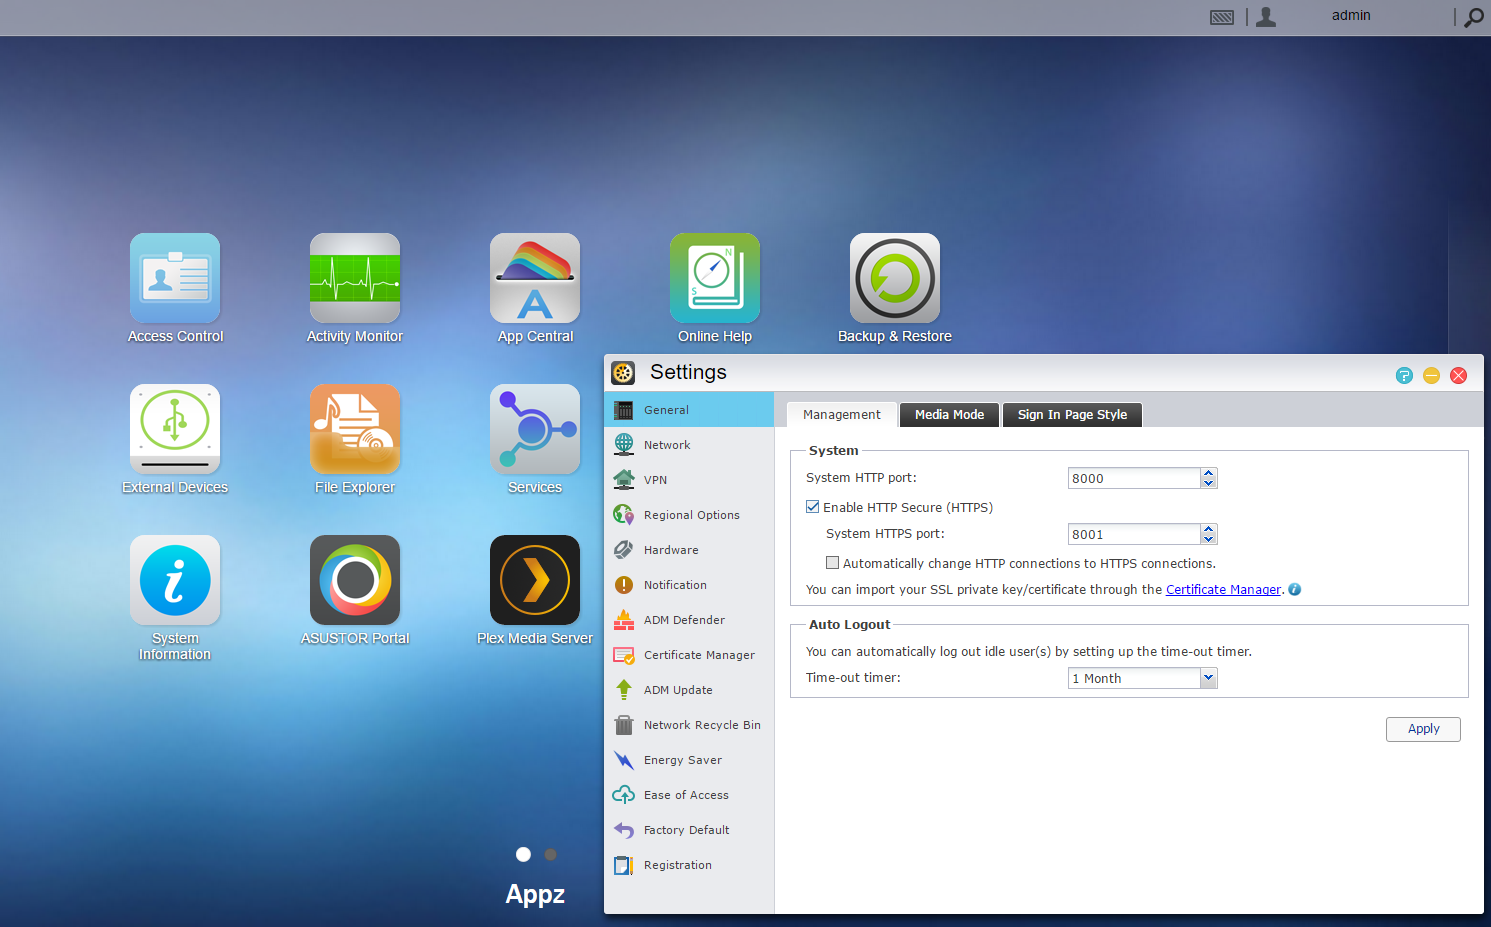
But you can also factor in a SATA drive. Turns out, if you visit the UP web store that you can buy a SATA shield board that turns one of your USB ports into a blistering fast SATA drive slot. It will set you back $85, but in return you get two USB ports and a SATA drive slot. This makes the UP board a suitable candidate for NAS production. Considering the horsepower you could easily surpass brands like Asustor (which just happens to be my favorite NAS devices).
It would also make the ultimate home streaming service, capable of streaming full HD without breaking a sweat!
Peripherals that make sense
One of the things I hate about the Raspberry PI community is that more often than not, they take for granted that everyone is an electrician or have a background in electronics. So when the moment comes that you want to broaden your horizon, you are faced with thousands of “add-on” products that you dont have a clue how works.
A good example is a remote control I ordered earlier. Seems like a fairly straight forward thing right? And the advert said “only 3 wires to solder, easy for beginners”. What I got was a smart looking remote, but the part that needs to be soldered have no clear markings of what exactly to solder. There are 8 pins to pick from, no “how to” manual — and this is just typical for the Raspberry community (it’s not the first time I have recieved stuff like this).
The UP webshop makes more sense. They dont have thousands of chips or gadgets, because you are expected to deal with things that run on USB and are supported by the operative system.
As such they sell you the most obvious parts:
- 10″ touch screen
- Sata drive shield
- Plastic casing
- Converters (USB 3 male/female etc.)
- Wifi dongle
- .. and so on
When it comes to remote control, which is really handy when coding kiosk software that eventually will be keyboard-less (so its the ultimate admin magic wand) take your pick. There are thousands of wireless USB remote control packages out there, and if they are compatible with Windows, they can be used with UP.
Also a hell of a lot easier to code for!
Personal verdict
This is by far the most exciting gadget I have seen in years. Much more exciting than the Sony Virtual Reality gogles for Playstation 4 (rev 2) that just came out. Dont think I was ever so disapointed as when I got that. Been waiting 20 years for VR to become a reality, only to realize you need a padded room if you want to move around.
So instead of buying the Playstation VR for XMas, get yourself 3 UP boards for the same price. I can guarantee that you will get much more joy from owning them than the Playstation Virtual Reality headset.
My personal verdict for the UP board is a shining 5 out of 6 stars!
No other board except the Raspberry PI 3 has ever gotten that kind of score on my website. Not even the iPad when that came out.
What about classic Emulation? How does that work?
How does it work? It is so smooth that im at a loss for words. Seriously, I dont even know where to begin describing how sweet this is.
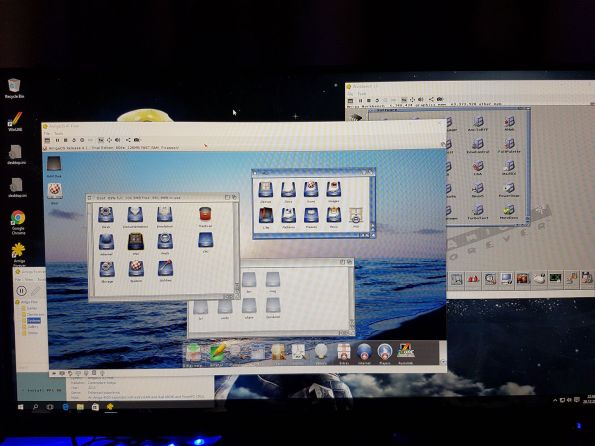
Let me say it like t his: When I fire up Amiga Forever and run the pimped up 3.x “enhanced experience” (read: one pimped up Amiga 1200), start IBrowse and visit Amigaworld.net, the webpage renders just as fast as Chromium renders. Scrolling with the mouse-wheel is blistering faster and you actually dont notice any difference between using the emulated Amiga or Windows.

This setup is pure joy on Amibian on the Raspberry PI. On the UP board its bliss, bliss on tap, bliss on demand. A perfect emulation experience all the way through.
Images download and render near instantly, music is crisp and clear, not a flicker or jitter in sight. And the CPU has depth, thats the main difference between Raspberry PI and the UP board. Let me explain what I mean with that.
I downloaded the latest freepascal (version 3.1) which is the same version that I use on Linux and Windows to produce modern products. Now on the Raspberry PI whenever you attempt to compile anything substantial, the whole thing goes into a grinding halt. The Raspberry PI is excellent for superficial things, especially desktop and games where it can fall back on the GPU and custom chips to get the job done.

Compiling anything, even older stuff that is a joke by today standard, is painful on the Raspberry PI. Here showing my retro-fitted A500 PI with sexy led keyboard. It will soon get a makeover with an UP board 🙂
But compilation is pure CPU work and this is where the Raspberry PI cannot hide what it is. A slow, underpowered ARM system on a chip, posing as a real computer.
I compiled a small shell-utility i coded especially for the Amiga, called AmigaZipper. A very humble program with barely 8000 lines of code. When compiling on my UAE Amiga running on the PI, it took almost an hour to produce an executable binary.
How long did it take on the UP board? oh, 5 seconds give or take. So where the Raspberry looks great for superficial things it lacks grit. The UP board however has so much more power it can apply to a task, and plows through it like a warm knife through butter.

Classic Amiga runs along nicely, eating around 40% of the cpu running in 1920x1080x32 bpp. Even with the latest freepascal (3.1) compiling on the 68k it never broke 60%. Perfect. Just perfect!
If you are serious about emulating Amiga up to OS 3.9, then this is absolutely the board to get! With the Raspberry foundation releasing Pixel for x86, we can only hope Gunnar Kristiansson creates Amibian for x86 as well — then all will be right with the world and the force will be in balance once again.
Merry Xmas!
UP board, first impressions for emulation
To get the most out of this post please read my previous post, Embedded boards, finally. For general use and emulating classical Amiga, also read my next article: UP board, a perfect embedded board.
In the previous post I went through the hardware specs for both the ODroid XU4 ARM embedded board, as well as the x86 based UP SoC board. Based on their specs I also defined some predictions regarding the performance I expect them to deliver, what tasks they would be best suited for – and what they would mean for you as a developer – or indeed an emulation enthusiast
In this post we are going to start digging into the practical side of things. And what is probably on everyone’s mind is: will the UP board be powerful enough to emulate and run Amiga OS 4.1 final edition? What about retrogaming, HTML5 and general use?
Well, let’s dig into it and find out!
Note: If emulation is not your cup of tea, I urge you to reconsider. I am a dedicated developer and can tell you that emulation is one of the best methods to find out what your hardware is capable of. Nothing is as demanding for a computer as emulating a completely different cpu and chipset, especially one as elaborate and complex as the Commodore Amiga. But I also use a Smart Pascal demo as a general performance test -so even if gaming is not you thing, the board and its capabilities might be.
EMMC storage, a tragedy without end

EMMC is cheap and easily available
The UP-board uses something called EMMC storage; this is quite common for embedded devices. Your TV tuner probably has one of these, your $100+ router and in all likelihood so your NAS or laser printer. To make a long story short this storage medium is flexible, cheap and easy for vendors to add to their custom chipset or SoC. It is marketed as a reasonable alternative to SSD, but sadly these two technologies have absolutely nothing in common except perhaps -that they both are devices used to store data. But that’s where any similarities stop; and truth be told the same would be the case for pen and pencil.
EMMC is an appalling technology, honestly. It works for some products, in the sense that you would gladly wear a cardboard box if the alternative is to walk around naked in public. For devices where responsiveness and efficiency is not the most pressing factor (like routers, TV tuners, set-top boxes and similar devices) it can even work well, but for devices where responsiveness and data throughput is the most important thing of all (like a desktop or emulation) EMMC is a ridiculous choice.
Just imagine, a powerful x86 embedded board with 4 gigabytes of ram, 4 x USB 3 ports, outstanding graphical performance, excellent audio capabilities – and all of it for $80?
Honestly, there are many cases where embedded boards are better off without them. I used to hate that the Raspberry PI 3 didn’t ship with EMMC, but that was before I got the pleasure of trying the storage medium myself and experience how utter shit it truly is. It reminds of ZIP disks, remember those? Lumpy overgrown floppy disks that went extinct in the 90’s without realizing it?
In terms of speed EMMC sits somewhere between USB 2 and your average SD card. The EMMC disk on the UP-board falls in the usable category at best. It works ok-ish with a modern operative system like Windows 10 or Ubuntu, but just like the Latte Panda and similar devices are haunted by a constant lag or dullness whenever IO is involved, the same is true for the UP-board. It saturates the whole user experience and its like the computer is constantly procrastinating. Downloading a file that should take 5 minutes suddenly takes 20 minutes. Copying a large file over the network, like a bluray HD file is borderline absurd. It took over half an hour! It normally takes less that 20 seconds on my desktop PC.
I might get flamed for this but my Raspberry PI 3 actually performed better when using a high-speed USB stick. I did the exact same test:
- Download the same file from my NAS right here at home
- The data goes straight from my NAS to the router and straight to disk
- On the PI i used a Sandisk 256 gigabyte USB pen-drive
I don’t have the exact number at hand, but we are talking 10-12 minutes tops, not half an hour. The PI is hopelessly inferior to the UP-board in every aspect, but at least the PI foundation was smart enough to choose low-price over completeness. The people behind UP could learn a thing or two here.

Top the x86 UP board, left bottom a Raspberry PI 3, bottom right the ODroid XU4
I simply cannot understand what they were thinking. Consider the following factors:
- The speed of running a server is now determined by the read/write performance of your storage device. Forget about factors like memory, number of active threads, socket capacity or network throughput.
- Should the operating system start paging, for example if you run a program that exceed the memory Windows has left (Windows eats 1 gigabyte of ram for breakfast) you are screwed. The system will jitter and lag while Windows desperately map regions of the pagefile to a fixed memory address, perform some work, then page it back again before switching to the next process.
I really wish the architects of the UP-board had just ditched EMMC completely because it creates more problems than it solves. The product would be in a different league had they instead given it four USB 3 ports (it presently have only one USB 3 port, the rest are USB 2). While I can only speculate, I imagine the EMMC unit costs between $20 to $40 depending on model (8 Gb, 16Gb or 32Gb). The entire kickstarter project would be way more successful if they had cut that cost completely. Just imagine, a powerful x86 embedded board with 4 gigabytes of ram, 4 x USB 3 ports, outstanding graphical performance, excellent audio capabilities – and all of it for $80?
It would be nothing short of a revolution.
Graphics
When it comes to graphics the board just rocks! This is where you notice how slow Raspberry PI 3 truly is. Raspberry PI 3 (RPI3) ships with a fairly decent GPU, and that GPU has been instrumental for the success of the whole endeavour. Without it all you have is a slow and boring ARM processor barely capable of running Linux. Try to compile something on the RPI3 (like node.js from source like I did) and it will quickly burst your bubble.
The UP board ships with a very capable little graphics chipset:
- Intel® HD 400 Graphics
- 12 EU GEN 8 up to 500MHz
- Support DirectX 11 through 12
- Supports Open GL* 4.2, Open CL*1.2, OGL ES3.0
- Built in H.264, HEVC, VP8 encoding/decoding
The demo I use when testing boards is a JavaScript demo. You can watch it yourself here.

The particles JavaScript canvas demo was coded in Smart Mobile Studio and push the HTML5 graphics engine to the edge
Here are some figures for this particular demo. It will help you get a feel for the performance:
- Raspberry PI 2b, 1 frames per second
- Overclocked 2 frames per second
- Raspberry PI 3b, 3 frames per second
- Overclocked 7 frames per second
- UP-board 18 frames per second
- Overclocked: not overclocked yet
As you can see, out of the box the UP board delivers 6 times the graphics throughput of a Raspberry PI 3b. And remember, this is a browser demo. I use this because webkit (the browser engine) involves so many factors, from floating point math to memory management, sub pixel rendering to GPU powered CSS3 effects.
What really counts though is that the PI’s CPU utilization is always at 100% from beginning to end; this demo just exhausts the RPI3 completely. This is because this JavaScript demo does not use the GPU to draw primitives. It uses the GPU to display a pixel buffer, but drawing pixels is purely done by the processor.
Where the RPI3 went through the roof and is almost incapable to responding while running that demo in full-screen, the UP-board hardly breaks a sweat.
It’s strolls along with a CPU utilization at 23%, which is nothing short of fantastic! Needless to say, its allocating only a fraction of its potential for the task. It is possible under Windows to force an application to run at a higher priority. The absolute highest mode is tp_critical, which means your program hogs the whole processor. Then you have tp_highest, tp_higher, tp_high, to_normal – and then some slow settings (tp_idle for example) that is irrelevant here.
Still, six times faster than the Raspberry PI 3b yet only utilizing 23% of its available horsepower? That means we got some awesome possibilities at our fingertips! This board is perfect for the dedicated retrogamer or people who want to emulate more modern consoles, emulation that is simply too much for a Raspberry PI 3 or ODroid to handle. Personally I’m looking forward to the following consoles:
- Playstation 1 and 2
- Nintendo Wii
- XBox one
- Nintendo Gamecube
- Sega Saturn
Keep in mind that we are running Windows 10, not some esoteric homebrew Linux distro. You can run the very best emulators the scene has to offer. Hyperspin? No problem. Playstation 2 emulation? No problem. Sega Saturn emulation? A walk in the park. And before you object to Saturn, this console is actually a very difficult chipset to emulate. It has not one but 3 risc processors, a high quality sound chip and a distributed graphics chipset. It represents one of the most complex architectures even to this day.
As you can imagine, emulating such a complex piece of hardware requires a PC with some punch in it. But that’s not a problem for the UP board. It will happily emulate the Saturn while playing you favorite MP3’s and stream a movie from NetFlix.
Conclusion: the UP-board delivers a really good graphics experience. It has support for the latest DirectX API and drivers; OpenGL (and associated libraries) is likewise not a problem. This board will deliver top retro gaming experiences for years to come.
Amiga Forever
Right, since I own Amiga forever from Cloanto and recently bought Amiga OS 4.1 to use exclusively with that – it made more sense for me to just install Amiga forever directly on the UP-board and copy the pre-installed disk image over. I do have the ordinary and latest build of UAE, but I wanted to just see how it performed.
This is where I first noticed just how darn slow EMMC is. Even simple things like downloading Amiga Forever from Cloanto’s website, not to mention copying the OS 4.1 disk image over the local network took 10-15 minutes each (!). This is something that on my ordinary work PC would have taken seconds.
At this point I became painfully aware of its limitations. This is just a low-priced x86 embedded board after all, it’s not going to cure cancer or do your dishes. Just like the Raspberry PI 3 suffers whenever you perform disk IO – so will all embedded boards bound to less than optimal storage devices. So the CPU is awesome, memory is great, USB 3 port blazing, graphics and GPU way ahead of the competition; in short: the UP board is a fantastic platform! So don’t read my negative points about EMMC storage as being my verdict on the board itself.
Now let’s look at probably the most advanced emulation task in the world: to emulate the Commodore Amiga with a PPC accelerator.
Emulating Amiga OS 4.1, is the UP board capable of it?
If we look away from the staggering achievement of emulating not one chipset, but two (both 68k and PPC) side by side, I can tell you that AmigaOS 4.1 works. I write works because in all honesty, you are not going to enjoy using Amiga OS 4.1 on this board. Right now I would categorize it as interesting and impressive, but it’s not fast and it’s not enjoyable. Then again, OS 4.1 and PPC emulation is probably the hardest and most demanding emulation there is. It is a monumental achievement that it even works, let alone boots up a $150 embedded computer the size of a credit card.
Next generation Amiga, it works but the board is not powerful enough to deliver an enjoyable experience. Classic Amiga’s however is the best you can imagine.
So if you are considering the UP-board solely to emulate a next generation Amiga, then you either wait for the “UP 2 board” that will be released quite soon (march 2017) or look at alternatives. I honestly predicted that it would pull this off, but sadly that was not the case. It lacks that little extra, just a little bit more horse-power and it will be a thing of beauty.
Storage blues
Had I known how slow the EMMC storage was I would have gone for the UDOO ultra instead, which is a big step up both is power and price. It retails at a hefty $100 above the UP board, but it also gives you a much faster CPU, 8 gigabyte memory and hopefully – a faster variation of EMMC storage. But truth be told I sincerely doubt the disk IO on the EMMC is significantly faster than for the UP-board.
Either way, if fast and furious PPC emulation is your thing, then $250 for the ODOO Ultra is still half the price of the A1222 PPC board. I mean, the A1222 next generation Amiga motherboard is just that: a motherboard. You don’t get a nice reasonably priced Amiga in a sexy case or anything like that. You get the motherboard and then you need to buy everything else on the side. $500 buys you a lot of x86 power these days so there is no way in hell im buying a PPC based Amiga motherboard for that price. Had it been on sale 10-15 years ago it would have been a revolution, but those specs in 2017? PPC based? Not gonna happen.
So if you really want to enjoy OS 4.1 and use it as a real desktop, then I have to just say go for the real deal. Get the A1220 if you really want to run OS 4.1 as your primary desktop. I think it’s both a waste of time and money, but for someone who loves the idea of a next generation Amiga, just get it over with and fork out the $500 for the real thing.
Having said all this, emulating OS 4.1 on the UP board is not terrible, but it’s not particularly usable either. If you are just curious and perhaps fire up OS 4 on a rare occasion – it may be enough to satisfy your curiosity; but if you are a serious user or software developer then you can forget about the UP-board. Here it’s not just the EMMC that is a factor, the CPU simply don’t have the juice.
Classic Amiga is a whole different story. Traditional UAE emulating an Amiga 4000 or 1200 is way beyond anything the Raspberry or ODroid can deliver. The same goes for retrogaming or using the board for software development.
Unless you are prepared to do a little adaptation that is.
Overcoming the limitations
Getting around the slow boot time (for OS 4) is in many ways simple, as is giving the CPU a bit of kick to remove some of the dullness that is typical for embedded boards. The rules are simple:
- Files that are assessed often, especially large files should be dumped on a USB thumb-drive. Make sure you buy a USB 3.0 compliant drive and that its class 10 (the fastest read/write speed). And naturally, use the USB 3.0 socket for this one
- Adding a fan and then doing some mild tweaking in CPU-Z and GPU-Z overclocking tools for Windows. As mention in other articles, you don’t want to mess around with overclocking if you don’t have the basic setup. Lack of cooling will burn your SoC in a couple of minutes. There is also much to be said about restraint. I find that mild overclocking does wonders, it also helps preserve the cpu for years to come (as opposed to running the metal like a hound from hell, burning it to a crisp within a year or less).
- Drop using the EMMC completely and install Windows on a dedicated USB 3.0 external harddisk. But again, is it a full PC you want? Or is it a nice little embedded board to play with?
Since Amiga forever and Amiga OS 4.1 was where I really had problems, the first thing I did was to get the Amiga system files out of the weird RP9 file format. Its is basically just a zip-file containing the harddisk image, configuration files and everything you may need to run that Amiga virtual machine. But on a system with limited IO capacity, that idea is useless.
Once I got the harddisk HDF file exported, I mounted that and also added harddisk folder. Then its just a matter of copying over the whole Amiga OS disk to the folder. This means that the Amiga files will now reside on the PC drive directly rather than in some exotic structured storage file mimicking a harddisk from the mid 90’s.
As expected, booting from Windows to Workbench went from 1 minute (yes, I kid you not!) to 20 seconds. Still a long wait by any measure — but this can be easily solved. It become clear to me that maybe, just maybe, the architect of an otherwise excellent embedded board had a slightly different approach to storage than we do.
I know for a fact that it’s quite common to use EMMC purely as a boot device, and then distribute IO payload to external drives or USB sticks. Some also do the opposite and place the OS on a high-speed USB stick (as mentioned above) and use the EMMC to store their work. With “work” I am here referring to documents, email, perhaps some music, images and your garden variety assortment of data.
Add overclocking to the mix and you can squeeze out much better performance of this fantastic little machine. I still cant believe this tiny little thing is capable of running Windows 10 and Ubuntu so well.
Final verdict
I could play with this board all day long, but I think people get the picture by now.
The UP-board is fantastic and I love it. I was a bit let down by not having enough juice to run Amiga OS 4.1 final edition, but in all honesty it was opportunistic to expect that from an Intel Atom processor. I’m actually impressed that it could run it at all.
I was also extremely annoyed with the EMMC storage device (a topic I have exhausted in this article I think), and in the end I just disabled the whole bloody thing and settled on a high-quality USB 3 stick with plenty of space. So it’s not the end of the world, but it does feel like I have just thrown $50 down the toilet for a feature I will probably never use. But who knows, when I use it to run my own programs and design a full system – perhaps it wont matter as much.
Is it worth $150 for high-end model? I cannot get myself to say yes. It is worth it compared to the high-end ARM boards that go for $80-$120, especially since x86 runs Windows, and that opens up for a whole universe of software that Linux just don’t have; at least not with the same level of user-friendlyness.
Having said that, there are two new x86 boards just around the corner, both cheaper and more powerful. So would I buy this board again if I could return it? No.
I love what I can do with it, and its way ahead of Raspberry PI or the ODroid boards I have gotten used to and love, but the EMMC storage just ruins the whole thing.
Like I wrote – perhaps it will grow on me, but right now I feel it’s overpriced compared to what I would have gotten elsewhere.
UP-board for software developers
So far I have focused exclusively on retrogaming and emulating the next generation PPC based Amiga systems. This is an extremely demanding task, way beyond what a normal Windows application would ever expect of the system. So I havent really written anything substantial about what UP has to offer software developers or system integrators.
Using this board to deliver custom applications written in Delphi, C++ or Smart Pascal [node.js] is a whole different ballgame. The criteria in my line of work are very different and it’s rare that I would push the board like I have done here. It may happen naturally, perhaps if I’m coding a movie streaming server that needs to perform conversion on demand. Even a SVN or Github server can get a CPU spike if enough people download a repository in ZIP format (where a previously made file is not in the cache). But if you have ever worked with embedded boards you should know what to avoid and that you cannot write the code like you would for the commercial desktop market.
The UP board is more than suitable for products like a NAS, personal cloud server or kiosk systems running node.js and rendering with webkit. Native Delphi or C++ applications perform even better.
If you need an affordable, powerful and highly versatile embedded board for your Delphi, C++ or Smart Pascal [node.js] products, then I can recommend the UP boards without any hesitation!. The board rocks and has more than enough juice to cover a wide range of appliances and custom devices.
As a Delphi or Smart Pascal centric board it’s absolutely brilliant. If you work with kiosk systems, information booths or media servers along the lines of PLEX or Asustor, then no other board on the market gives you the same bang for your bucks. There is simply no traditional embedded retailer than can offer anything close to UP in the $90- $150 range.
If we compare it to traditional embedded boards, for instance a similar configuration sold by Advantec, you save a whopping 50% by getting the UP board instead (!)
Take the MIO-2261N-S6A1E embedded board. This has roughly the same specs (or in the same ballpark if you will), but if you shop at Advantec you have to fork out 215 euros for the motherboard alone! No ram, no storage – just the actual motherboard. You don’t even get a power supply.
What you do get however, is a kick ass sata interface, but you still have to get a drive.
If we try to match that board to what UP gives you for $150 (and that is the high-end UP board, not the cheap model) you hit the 300 euro mark straight away, just by getting the ram chips and a power supply. And should you add a tiny SSD disk to that equation, you have now reached a price tag of 350 euros ($366). So the UP-board is not just competitive, it’s trend setting!
So even though I would refrain from getting the UP board purely for emulating next generation PPC Amiga computers, I will most definitively be using it for work! It is more than capable of becomming a kick-ass NAS, a fast and responsive multimedia center, a web server for small businesses, a node.js service stack or cloud machine – and when it comes to kiosk systems, the UP-board is perfect!
So for developers I give it 4 out of 6 stars!
Embedded boards, finally!
I was about to conclude that this day horizontally sucked beyond measure, but just as I thought as much -the door bell rang. It was FedEx (ta da!) with not one package, but two packages of super nerdy goodness. And here I was sure these puppies wouldnt arrive until after Xmas!
Top the x86 UP board, left bottom a Raspberry PI 3, bottom right the ODroid XU4
The ODroid XU4
A while back I ordered the very exciting “Raspberry PI 3 killer” ODroid XU4. It’s a bit of a unicorn, said to be roughly 10 times faster than the Raspberry PI 3. Honestly, having looked at the specs I can’t imagine it being more than 3 to 4 times faster; depending greatly on what your application is doing and the operative system in question. Here is the full spec sheet:
- Samsung Exynos 5422 Cortex™-A15 2 GHz and Cortex™-A7 Octa core CPUs
- Mali-T628 MP6(OpenGL ES 3.0/2.0/1.1 and OpenCL 1.1 Full profile)
- 2 Gbyte LPDDR3 RAM PoP stacked
- eMMC 5.0 HS400 Flash Storage
- 2 x USB 3.0 Host, 1 x USB 2.0 Host
- Gigabit Ethernet port
- HDMI 1.4a for display
As you can see the ODroid comes armed with 8 CPU cores while the Raspberry PI 3 (RPI3) has only 4. It also comes with twice the RAM (which really impacts performance), and tests have shown the ODroid disk/IO speed is roughly double that of the RPI3. But the cores is what caught my eye, because 8 cores means 8 simultaneous threads. This means code written for node.js, apache [php] or indeed custom, natively compiled Free Pascal servers will be able to handle twice the payload straight off the bat. For stateless protocols like http, I am guessing a performance factor of 3 to 1 compared to an RPI3.
Having said all this, there will be exceptions where the PI3 performs equal of better. The RPI3 SoC have better HD video functionality, so the ODroid have to work harder to produce the same.
For those of you thinking the ODroid will solve all your Amiga emulation problems, the answer is yes. It is significantly faster than the RPI3. But never forget that single threaded applications like UAE (Unix Amiga Emulator) involves a high degree of chipset synchronization. If the chipset performs out of sync (for instance if the blitter finishes faster than it should), all manner of problems will occur. So all that synchronization causes some parts to wait. Meaning no matter how fast your computer is (even my Intel i7 CPU) UAE will never reach peak performance. It will never use the full capacity of a single core due to synchronization.
A small note is also popularity, which means less updates. ODroid has a somewhat slower update cycle than Raspberry. It has thousands of users, but it’s not even close to getting the attention of the Raspberry PI project. And where the Raspberry website has been community oriented, with inspiring graphics, free tutorials and a huge forum from day one – the ODroid has nothing that even compares.
From what I read and hear the biggest problem has been kernel updates. But, seriously, that is often a Linux fetish. Unless it’s a super important update, like going from 32 to 64 bit or patching a really terrible security flaw – most users are not going to be bothered by a 2 versions old kernel. You still have access to the proverbial library of Alexandria that is aperture package manager (apt-get command) and compiling a few programs from code is not that hard. It’s typically download, unpack, configure, make and install – and that’s it.
Naturally, considering the faster CPU of the ODroid, double the ram, double the IO speed – emulators like UAE will be awesome. ODroid is also the only ARM SoC out there in this price range that plays Sega Saturn and PSX 2 games without any problems. And it will also be far better suited for servers, be it natively compiled freepascal servers, mono ASP.net or Smart Pascal [node.js] work.
The UP x86 board
The second package contained another embedded board, this time the x86 based UP board. I bought the most expensive model they had, containing 4 gigabytes of ram and 64 GB EMMC on-board storage. The board sports a 64 bit Intel® Atom™ x5 Z8350 processor, running as high as 1.92 GHz. Between Raspberry PI 3, ODroid XU4 and UP – let there be no doubt which model will come out on top.
- Intel® Atom™ x5 Z8350 Processor 64 bit – up to 1.92GHz
- Intel® HD 400 Graphics ,12 EU GEN 8, up to 500MHz Support DX*11.1/12, Open GL*4.2, Open CL*1.2 OGL ES3.0, H.264, HEVC(decode), VP8
- 4GB DDR3L
- 64GB eMMC
- 4 x USB2.0 external connector
- 2 x USB2.0 port (pin header)
- 1 x USB 3.0 port
- 1 x Gb Ethernet (full speed) RJ-45
- HDMI (DSI / eDP)
- MIPI-CSI Camera interface
- 5V DC-in @ 3A 5.5/2.1mm jack
Where the ODroid is rumoured to be 10 times faster than a RPI3, that is a statement closer to an urban myth rather than fact; The UP board on the other hand IS without a shadow of a doubt 10 times faster (and then some), no question about it. Since this is essentially a vanilla x86 SoC PC, the world is your oyster. The full onslaught of x86 software is at your disposal, be it Windows or Linux you chose as your base.

x86 UP board, same size as the PI3 but packing a hell of a punch!
The board has no problems running Windows 10, Ubuntu (full 64 bit version) and Android. And it’s actually more responsive than a few laptops on sale. I wanted a cheap laptop for dedicated Amiga Emulation – but having tested both the low-end Asus and Dell models it just left me wanting. The problem with cheap model laptops is often the absurd memory they ship with (1 to 2 gigabyte). The devices spend more time swapping data back and forth between ram and disk than they do running your code!
This is not the case for the UP board thanks to the on-board 4 gigabytes of ram.
Being a Embarcadero Delphi and Smart Mobile Studio (object pascal for JavaScript) developer this board is perfect for my needs. It has so much more to offer than the cheap ARM boards and is something I can use to create custom hardware projects and avoid many of the adaptation problems associated with ARM Linux.
While I love Raspberry PI 3, Linux takes some getting used to. There are things that takes me days to figure out on Linux that I completed in minutes on Windows (I have been using Windows since the beginning after all). This will change as my skill and insight into Linux matures, but if I can choose between the RPI3 and the UP board, I would pick the UP board every time.
Price is a factor here. RPI3 sells for between $35-40, the ODroid retails for $99 while the x86 UP board can be yours for $150. But you can also buy a cheaper model with less ram and EMMC storage. The UP provider has the following options:
- $99 – 2 gigabyte memory, 16 gigabyte EMMC storage
- $109 – 2 gigabyte memory, 32 gigabyte EMMC storage
- $129 – 4 gigabyte memory, 32 gigabyte EMMC storage
- $150 – 4 gigabyte memory, 64 gigabyte EMMC storage
If you’re thinking “oh, for that price I could get 2, 3 and 4 PI’s respectively!”, keep in mind the level of CPU power, graphics speed and available software here. The fact that you can install and run Windows 10 and just copy over your Delphi or Smart applications is really sweet.
And if you are into emulation then naturally, Windows has the latest and greatest. Things like EmulationStation is going to run so much better on this device than anything else at this price out there, especially if you get the x86 Linux edition. You can run the latest WinUAE on Windows, giving you full PPC emulation and essentially booting straight into Workbench and OS4.1. $150 for an OS4.x capable SoC that is x86 based makes a hell of a lot more sense than forking out $489 for the A1222 low-end PPC based Amiga NG board planned for 2017. I mean, who the hell buys PPC in 2017 (!) Emulation will always be a little bit slower than the real thing, but we are talking negligible.
And with the UP board you can also re-cycle the hardware when you get bored with OS 4. I mean, there are only so many things you can do with a modern Amiga. It is great fun for enthusiasts like myself, but I would much rather run a juiced up version of OS 3.9 with my massive collection of WHDLoad software, cd32 software and modern compilers (like Free Pascal 3.1 which work brilliantly on an emulated, classic Amiga).
Programming
For the developer the UP board gives you the same choices you enjoy on your Windows development machine in general. You can use it to deliver your Delphi, C++ builder or Smart Pascal solutions. If you happen to own a Microsoft Embedded license its performance will be greatly enhanced since you can drop a lot of the “standard” stuff that has to ship with Windows. Remember, a standard Windows installation is written to work on millions of PC’s and equal number of different hardware configurations. For customized, single purpose applications (like a kiosk system, information booth, cash machine type system) you will be able to cut out quite a lot. Do you need support for printers? Do you need driver-collection for hardware that is not there? Windows embedded allows you to cut the disk image down to the bones, and it’s also written to run on slower CPU’s than what people in general own – so the performance is much better.
- Run your Delphi projects, it’s a normal PC after all
- Run your node.js Smart Pascal projects with ease
- Make use of nodewebkit for Smart Pascal to create full screen, desktop oriented software, enjoy the full scope of GPU powered CSS
- Enjoy the debugging tools you already know
- Run familiar databases like MSSQL, MySQL and Firebird with a more friendly and developed editors and tools
- Use the more friendly backup solution that ships with Windows rather than some cryptic Linux solution (although some Linux versions that have desktop control-panels are just as great!)
- Use GPIO ports from Delphi and C++ builder (!)
- Just hook your UP board into your network and install/setup via remote desktop. It saves a lot of time.
If you are a Delphi programmer looking for a reasonable embedded board to ship your killer Windows-based product, the UP board is by far the best option I have seen (and I have tested quite a few board out there!).
The problem with high-end boards is not just the initial price, which can be anything from $300 to $400. Sure, these boards Intel i2 or i3 processors (much faster), but you end up paying extra for everything. Need a new ram module? That will set you back a pretty penny! Want GPIO? Again we are talking $100+ just to get that.
By the time you sum up the expenses, you realize it would have been cheaper to just visit the local computer store and bought a mico-atx board with more ram and a faster processor (!). Micro-atx is not that big, perhaps 2 times larger than the UP board (if you place them into a square). The micro-atx is often to high to be practical embedded boards where you want to cram as much hardware as you can into something the size of a router or set-top-box. The heat sink hovers over the motherboard like the eye of london.
Here is what you should have in mind:
- Is size a factor?
- No
- Buy a cheap mico-atx pc
- Yes
- Take a look at the boards listed below
- No
- Do you need Windows support?
- No
- Get a ARM based device
- Yes
- Get the affordable UP board
- No
- Do you need an i3 or i5 CPU?
- Do you need GPIO built-in?
- No
- See options above
- Yes
- Take your pick between the boards out there
- No
Note: The UP project is presently busy working on their second kickstarter, which is cleverly called “Up 2” (sigh). This board is slightly larger, being dubbed “UP squared”, but there is a good reason for that. First of all it ships with the more powerful Intel® Pentium™ N4200 2.5 GHz CPU, up to 8 gigabyte of memory and 128 gigabyte emmc storage. Just like the present UP board you will be able to pick a configuration that matches your wallet, but they are aiming at roughly the same price-range as they have now. Head over to the UP project and have a peek at the specs!
Negatives
So far the only negative thing about the UP board is the speed of the emmc storage. As you probably know, emmc is a storage medium designed to be a cheap alternative to SSD. But when it comes to speed it can be anything from SD card to USB 3 in actual performance. This is very vendor spesific and obviously the cheaper models are going to be the slowest. So the first thing you are going to notice is that even though this is a PC, installing things takes a lot longer.
You can however enter the bios and boot from a USB 3 stick. For homebrew projects that shouldnt matter much, and these days a sexy and small 128 or 256 gigabyte (you know, those tiny usb storage devices that is barely the USB socket and little else) is affordable.
I find myself having to look for negatives here. I do think the UP organization should do something about the startup of the device. When you boot the UP logo is displayed, but they should have added a line of text about what key to press for the bios. I ended up going through the typical ones, F1, F2, F8 and F10 which did nothing. The next key was printscreen, before i finally hit DEL and the bios editor came up.
Insignificant, but a small detail that would make their product more polished.
A far worse notion is how they charge money for branding. When the product boots the UP logo comes into view for a couple of seconds (in full-screen). If you want to replace that, the minimal fee is $500 (for a small picture). This is something that simply infuriates me, because you cant change it.
When you buy an embedded board for production purposes, hidden costs such as this for something as simple as a picture – is completely unacceptable. I sincerly hope they drop this practise, because I will not use a board with a fixed boot picture in the embedded systems I deliver. There are plenty of other boards about there with similar specs at competitive prices. Being able to brand your own system is considered normal in 2016 and it has been common for years now.
At least an option in the bios for removing or hiding the UP logo should be in place.
The test
For the next few days before and after Xmas, I’ll be playing with these boards as much as time allows. I have already installed the latest Ubuntu on the UP board – and it performed brilliantly. I am presently giving Windows 10 a test drive, and my primary aim will be Smart Mobile Studio graphics demos and UAE running Amiga OS 4.1 final edition. I will also test how emulators work. This is especially exciting for the ODroid since that is the one most people will pick as an alternative to Raspberry PI 3.
If you are a dedicated retro-gamer or just love all things Amiga then again, the UP board should be of special interest to you. It will set you back $150, but considering that it has the exact same form-factor as the Raspberry PI (except its components go a few mm. higher) is considerably faster (in a league way beyond both the PI and ODroid) – this could be your ticket to get a cheap “next-gen” emulated Amiga. It will run OS 4.1 final without problems under WinUAE and it will be a pleasant experience.
I will give you updates as the frame rates, execution speed and overall performance comes in. Oh and the tests will obviously use the RPI3 as the baseline.
Cheers guys!
JSON Persistence, understanding it
Two days ago I posted what I believe to be an elegant solution to general, JSON based, object persistency. It was naturally never meant to a “one storage mechanism to rule them all” type post; nor solution for that matter. But it did present the solution to a problem I know many people have been struggling with or had issues with quite commonly. It’s one of those issues that you never really see until you get there, until you sit down to code something that happens to include JSon serialization. And it bugs you because things like this should really be a one liner.
To clarify some of the responses I have recieved, both here and on Facebook, I figured it would be appropriate to do a follow-up. I was quite tired when I posted that code, and I also realize that if you havent really bothered with JSON storage before (or indeed, looked at alternatives to Delphi’s somewhat old-fashioned, binary only built-in mechanism) then you might miss my point completely.
For instance, one person posted “what do you do with methods or properties that are not defined, just throw them away”. At first I frankly did not understand what the person was talking about – but then I realized that he had confused my talk about compilers and parsers and the fact that the code came from a library built for that -for the very purpose and point of the article.
Ofcourse I don’t throw away methods or properties, but that has nothing to do with the actual article. The article was really about finding a simple, elegant way of storing an object instance as JSON. Preferably using nothing but what Delphi has to offer.
What is the problem?
Before we look at the problem directly, let’s get an overview of the situation. For instance, how do you store a Delphi object instance as JSon? What are the options we have to work with? What exactly does Delphi provide out of the box?
These are fair, simple questions. Yet if you google it or look it up on Stack Overflow, the answers are overwhelmingly diverse. If you take into account libraries like SuperObject which people seem to mix and match with built-in classes from the runtime library, finding a simple reply can be a challenge. Especially if you don’t know that much about JSon to begin with or are learning Delphi from scratch.
Now to cut a long story short, Delphi has some outstanding solutions with regards to JSon. But naturally there are a few aspects here and there that could be better. And that is not really criticism, an RTL is a complex thing to write and maintain. And the level of support Delphi has for almost everything imaginable is staggering. So I don’t feel this is so much a “lack” as it is an oversight or prioritization issue.
What is lacking is the bridge, or gap if you will, between the world of natively compiled assembly code objects in memory (read: ordinary object pascal objects), and easily representing these as a text-based, Json (JavaScript object notation) format.
To my knowledge there are only two methods you can use to “save” or “take a snapshot” of an object instance that results in Json. The first being:
LSomeObjVar := TJSon.ObjectToJsonObject(instance);
This essentially enumerates all the published properties of that instance and stores it directly in a JSon object (which is itself an instance) and returns that. Which is very handy if you are building a larger JSon schema containing many objects.
The second method, which does more or less the same is this:
LSomeStrVar := TJSon.ObjectToJsonString(instance);
As you no doubt guess that returns the actual JSon text rather than a JSon object. Which is even more handy since that’s ultimately what we want.
To be fair, extracting JSon information through the use of the VCL or FMX is not really a problem. It does what is expected in traditional manner, namely to enumerate published properties that are both readable and writable and emit these in the format in question.
Anyone familiar with Delphi’s Assign(), AssignTo() and the DefineProperty() methods, the latter being a topic of great confusion to beginners; and finally TFiler which is used to deal with data that cannot easily be represented by ordinary properties. If you have any knowledge of these then you should have intimate knowledge of how it all works.
Right, that was the “stringify” options at hand. Now let’s look at the second part of the magic trick – namely to reincarnate an instance from JSon text.
Parsing JSon into an instance
I may be missing something but to my knowledge there are only two methods we can use for this. Naturally you can choose to traverse an object yourself through RTTI, save the information as JSon, then assemble it by hand at the other end — or some variation of the two; but the keyword here were simple, elegant and at-hand. We all know that anything is possible if you sit down and allocate enough time and energy – but this was about what we can do out of the box.
The first method takes a JSon object containing the data, but it demands a class in order to know what instance to create:
TJSon.JsonToObject<TSomeClass>(Source)
This is, in essence, the problem. Knowing beforehand the classtype to use.
It is a problem if you have several classes that inherit from a common ancestor. For example, let’s say you are making an invoice program. And let’s say you have a base-class simply called TInvoice. Inheriting from that is TRetractedInvoice and TPaidInvoice.
- TInvoice
- TRetractedInvoice
- TPaidInvoice
TRetractedInvoice being a class that represents an invoice where where the customer has gotten his money back. Perhaps the product was damaged, did not match his expectations or something similar. Either way, this class is used to represent invoiced where the money has been returned. This is noted in the ledger for the books to even out. Otherwise there will be hell to pay should you get an audit.
The second class that inherits from TInvoice is TPaidInvoice. This decendant represents an invoice which has been paid in full. The transaction is complete and there is nothing to report. Just a normal sale.
Now you could argue that using classes to represent states is overkill. You could in fact just have TInvoice and then use a datatype to represent these states. But that’s not the point. You should be allowed to use classes like this, it should not even be a debate.
But how exactly do you know what class to use before the actual data has been read? No matter how you look at this problem, you cannot escape the fact that seeing into the future is reserved for circus sideshows and scam artists abusing peope’s insecurities.
Thankfully, TJSon presents a second alternative, namely one where you give it a pre-created instance and it will map the properties that match. So if a property in the JSon data match a property in the instance, it will populate it.
TJSon.JsonToObject(someinstance, Source);
But wait, that still does not solve our problem! Simply providing an a pre-made instance gives us more options ofcourse, but the problem of foresight and being able to look into the future is still there.
Unless, we make sure that looking into the past preserves the future that is.
The solution
The obvious solution is to simply store the classname with the JSON text when we stringify the instance. And that is precisely what I have done. This means ofcourse that we have to read the JSon data before we call JSonToObject() but honestly, that is a small price to pay for complete uniformity.
But this brings up a couple of other challenges, namely:
- How do we create a class based purely on a string-name?
- How do we avoid writing the same information for each step in the inheritance chain
When it comes to the first topic, this is where Registerclass() comes into play.
Every class you register through Registerclass() can also be created by name and it’s type looked up. This is an essential part of the binary, built-in persistant system Delphi has always shipped with. So we can put some faith in it.
Interestingly, when looking at these topcis, I suddenly realized something important. It took me a second to see that I was in fact imposing a condition that did not exist, not unless you wanted to clone instances. Because who will be doing the parsing and reading anyhow? There will already be an instance created to this exact piece of data: namely none other than “self”. This is why my solution contains:
procedure TQTXASTPersistent.Parse(ObjectData: string);
var
  LSchema: TJsonObject;
  LObjData: TJsonObject;
  LEntry: TJSonObject;
  LId: string;
begin
  LId := '';

  // Parse whole schema
  LSchema := TJSonObject( TJSonObject.ParseJSONValue(ObjectData, true) );
  try
    if LSchema.Values[QualifiedClassName] <> nil then
    begin
      // Find storage entry for our class
      LEntry := TJsonObject( LSchema.GetValue(QualifiedClassName) );

      // attempt to get the identifier
      if LEntry.Values['$identifier'] <> nil then
      LId := LEntry.GetValue('$identifier').Value;

      // validate identifier
      if LId.Equals(Classname) then
      begin

        // Grab the data chunk of our entry
        LObjData := TJSonObject( LEntry.GetValue('$data') );

        // Data PTR valid?
        if LObjData <> nil then
        begin

          // Map values into our instance
          try
            ReadObjectJSon(LObjData);
          except
            on e: exception do
            raise EQTXASTJSONError.CreateFmt
            ('Serialization failed, system threw exception %s with message "%s" error',
            [e.ClassName, e.Message]);
          end;

        end else
        raise EQTXASTJSONError.CreateFmt
        ('Serialization failed, unable to find section ["%s\$data"] in JSON document error',
        [QualifiedClassName]);

      end else
      raise EQTXASTJSONError.CreateFmt
      ('Serialization failed, invalid signature, expected %s not %s error',
      [classname, LId]);

    end else
    raise EQTXASTJSONError.CreateFmt
    ('Serialization failed, unable to find section ["%s"] in JSON document error',
    [QualifiedClassName]);
  finally
    LSchema.Free;
  end;
end;

procedure TQTXASTPersistent.ReadObjectJSon(const Source: TJSONObject);
begin
  TJSon.JsonToObject(self, Source);
end;
Simple, elegant and to the point.
It is also flexible to avoid the second topic mention above, namely the trap of recursive or repeatative data. So you can inherit from this class all you want, it will never produce JSon for it’s ancestor. It will always produce the full set of published properties of it’s datatype. Exclusively. So unless you override and mess about with how data is written, it will work quite elegantly for ordinary tasks.
As a safety meassure, I store the object information in its own namespace. I use the qualified name of the class as an entrypoint, and the data for that classtype is stored there. If you should inherit from the baseclass and introduce some special data (for example by overriding the WriteObjectJSon() and ReadObjectJSon() methods, that will automatically end up in it’s own namespace or entrypoint. Pretty cool if I say so myself 🙂
Let’s look at a simple example. Here I have a very humble class with two published properties. I changed the name TQTXASTPersistent to just TQTXPersistent. Just to make it simpler to read:
[TQTXAutoRegister]
TTestClass = class(TQTXPersistent)
private
  FFirst: string;
  FLast:  string;
published
  property FirstName: string read FFirst write FFirst;
  property LastName: string read FLast write FLast;
end;
When we create an instance of this, put something in the properties, then serialize. This is how the serialized data looks like:
{
"mainform.TTestClass":
{
"$identifier":"TTestClass",
"$data":
{
"first":"Jon",
"last":"Aasenden"
}
}
,
"$classname$":"TTestClass"
}
If I for some reason need to inherit from that again, and alter the storage routine manually to include more data, The “mainform.TTestClass” section will still be there, but now the properties particular to my new class will end up in its own section (!). They will never collide or overwrite each other. And the root property $classname$ will always contain the actual name of the class the data represents, never an ancestor. This is because inherited data is written first, and the actual instance will write it’s information last.
So here we have a pretty good system if you ask me. A lot easier to work with and deal with than manually having to traverse RTTI information. And even better, no external libraries required. Just what Delphi gives us out of the box.
Cloning, how did you solve it?
But the problem still remains. Namely the abillity to create an instance purely based on the information in the JSon data. Providing the class is known to delphi (or that I write some registerclass equivalent, but why recreate the wheel?).
Well, turned out that with the above mechanism in place, it was quite easy. Instead of a simple “clone” method I made it even more generic, a class function, allowing you to create any instance from a JSon file – providing the class has been registered with Delphi first:
class function TQTXASTPersistent.JSONToObject
      (const MetaData: string; var obj: TObject): boolean;
var
  LSchema: TJsonObject;
  LClassName: string;
  LType: TClass;
  LNameNode: TJSONValue;
  LObj: TQTXASTPersistent;
begin
  result := false;
  obj := nil;

  // Parse whole schema
  LSchema := TJSonObject( TJSonObject.ParseJSONValue(MetaData, true) );
  try
    LNameNode := LSchema.Values['$classname$'];
    if LNameNode <> nil then
    begin
      LClassName := LNameNode.Value;
      LType := GetClass(LClassName);
      if LType <> nil then
      begin
        LObj := TQTXASTPersistent( LType.Create );
        LObj.Parse(MetaData);
        obj := LObj;
        result := true;
      end;
    end;
  finally
    LSchema.Free;
  end;
end;
Well, I hope this clears up any confusion on the subject. In my own defence I was very tired when I posted the code, which is always a bad idea.
And as always, if you know of a better way, perhaps some command i have missed or a class I have overlooked, I would love to learn about it.
JSON persistence, when a classtype is only known at runtime
One of the cool things about Delphi is that there are usually many different ways of solving a problem.
When I write code I try to make it as simple as I can. There was a time where I would jump in and try to speed things up with assembler, use exit in for/next loops to avoid setting the result more than absolutely necessary and try to squeeze every last drop of performance out of my PC.
But what about those cases where you don’t know, where you have a large inheritance chain involving many classes – all of which can be serialized and have parent/child relationships impossible to predict?
But as you grow a little bit older and perhaps a tiny bit more mature (ahem, at my rate I’ll hit puberty sometime next year) you start to value different things. Maintainability, safety and readability suddenly become an active part of your vocabulary. So you start looking at what’s already in Delphi rather than coding a faster, cooler version of the wheel.
That JSON thing
I must have seen about 100 different serialization schemes for Delphi. Some RTTI walkers, some binary only streaming, and some even hand-write every property, which to me utterly defeats the purpose of RTTI. I mean, what is the point of RTTI if you cannot automate how classes are saved? And perhaps more importantly: how classes are loaded back.

Serialization plain and simple
Most examples online deal with known classes. Meaning that the code expects you to hardcode the target type you want to de-serialize. Again I find this to completely defeat the purpose of both JSON, RTTI and persistence; the whole point of serialization is being able to reduce an instance to a portable, safe, readable format (string); and then re-create that instance without any loss of information from the portable format at will.
Known at runtime
Having to know exactly what class a piece of JSON text is prior to serialization is backwards, at least to my mind. There will naturally be situations where you do know exactly what class will be involved – at it may be fixed and never change (like child objects of a particular type). But what about those cases where you don’t know, where you have a large inheritance chain involving many classes – all of which can be serialized and have parent/child relationships impossible to predict?
In my case, an AST (abstract symbol tree) which is a model of a program. It’s what a parser and compiler generates before transforming it into machine-code, or in my case bytecodes and JavaScript.
As you can guess, an AST structure can contain all manner of combinations and parent/child relationships. Everything is parsed, validated and placed into the AST structure. Every parameter or return datatype is attached to its logical parent.
In short: you can forget about foresight or hardcoding anything! And if JSON is going to be of any use, it has to be able to de-serialize and recognize a class on the spot.
Autoregister
Earlier I posted an example of an attribute that autoregister a class with Delphi’s persistent framework. To explain what it means to register a class is beyond the scope of this post, but it essentially makes a class “known” to Delphi. Making Delphi able to recognize its type and re-create it by name alone. But this system is mainly used for binary storage, not JSON.
But it’s actually exactly what we need to automate JSON serialization.
Getting into it
Since I can’t really post a whole AST with nearly 100 classes here, I will just post this one class that contains the JSON storage mechanism you need. Just inherit from that class (clean it up and rename it first) and each inheritance step will actually take care of itself. It should be easy enough to extract the essence of this code.
You also want the AutoRegister Attribute I posted earlier! Also keep in mind that in this case we de-serialize to the current instance. You simply need to use Getclass() to get the classtype by name, create an instance of it and then de-serialize the JSON into a fresh new instance.
uses
  System.Rtti, System.TypInfo, System.Sysutils,
  System.Classes, System.Generics.Collections, System.Json,
  REST.Json, REST.JSon.Types, REST.JsonReflect, autoregister;

  [TQTXAutoRegister]
  TQTXASTPersistent = class(TInterfacedPersistent)
  protected
    procedure WriteObjectJSon(const Target: TJSONObject); virtual;
    procedure ReadObjectJSon(const Source: TJSONObject); virtual;
  public
    procedure Assign(Source: TPersistent); override;
    function  Stringify: string; virtual;
    procedure Parse(ObjectData: string); virtual;
    class function JSONToObject(const MetaData: string; var obj: TObject): boolean;
  end;

//##########################################################################
// TQTXASTPersistent
//##########################################################################

procedure TQTXASTPersistent.Assign(Source: TPersistent);
begin
  if assigned(source) then
  begin
    if (source is Classtype)
    or (source.InheritsFrom(ClassType)) then
    begin
      Parse( TQTXASTPersistent(Source).Stringify );
    end else
    inherited Assign(Source);
  end else
  inherited Assign(Source);
end;

function TQTXASTPersistent.Stringify: string;
var
  LObj: TJsonObject;
begin
  LObj := TJsonObject.Create;
  try
    WriteObjectJSon(LObj);
  finally
    result := TJSon.Format(LObj);
    LObj.Free;
  end;
end;

procedure TQTXASTPersistent.Parse(ObjectData: string);
var
  LSchema: TJsonObject;
  LObjData: TJsonObject;
  LEntry: TJSonObject;
  LId: string;
begin
  LId := '';

  // Parse whole schema
  LSchema := TJSonObject( TJSonObject.ParseJSONValue(ObjectData, true) );
  try
    if LSchema.Values[QualifiedClassName] <> nil then
    begin
      // Find storage entry for our class
      LEntry := TJsonObject( LSchema.GetValue(QualifiedClassName) );

      // attempt to get the identifier
      if LEntry.Values['$identifier'] <> nil then
      LId := LEntry.GetValue('$identifier').Value;

      // validate identifier
      if LId.Equals(Classname) then
      begin

        // Grab the data chunk of our entry
        LObjData := TJSonObject( LEntry.GetValue('$data') );

        // Data PTR valid?
        if LObjData <> nil then
        begin

          // Map values into our instance
          try
            ReadObjectJSon(LObjData);
          except
            on e: exception do
            raise EQTXASTJSONError.CreateFmt
            ('Serialization failed, system threw exception %s with message "%s" error',
            [e.ClassName, e.Message]);
          end;

        end else
        raise EQTXASTJSONError.CreateFmt
        ('Serialization failed, unable to find section ["%s\$data"] in JSON document error',
        [QualifiedClassName]);

      end else
      raise EQTXASTJSONError.CreateFmt
      ('Serialization failed, invalid signature, expected %s not %s error',
      [classname, LId]);

    end else
    raise EQTXASTJSONError.CreateFmt
    ('Serialization failed, unable to find section ["%s"] in JSON document error',
    [QualifiedClassName]);
  finally
    LSchema.Free;
  end;
end;

procedure TQTXASTPersistent.WriteObjectJSon(const Target: TJSONObject);
var
  LObj: TJsonObject;
begin
  LObj := TJSonObject.Create;
  LObj.AddPair('$identifier', ClassName);
  LObj.AddPair('$data', TJSon.ObjectToJsonObject(self) );
  Target.AddPair(QualifiedClassName, LObj);
  Target.AddPair('$classname$', ClassName);
end;

procedure TQTXASTPersistent.ReadObjectJSon(const Source: TJSONObject);
begin
  TJSon.JsonToObject(self, Source);
end;

// This function will create any registered class based on name.
// The class must be registered first.
class function TQTXASTPersistent.JSONToObject
      (const MetaData: string; var obj: TObject): boolean;
var
  LSchema: TJsonObject;
  LClassName: string;
  LType: TClass;
  LNameNode: TJSONValue;
  LObj: TQTXASTPersistent;
begin
  result := false;
  obj := nil;

  // Parse whole schema
  LSchema := TJSonObject( TJSonObject.ParseJSONValue(MetaData, true) );
  try
    LNameNode := LSchema.Values['$classname$'];
    if LNameNode <> nil then
    begin
      LClassName := LNameNode.Value;
      LType := GetClass(LClassName);
      if LType <> nil then
      begin
        LObj := TQTXASTPersistent( LType.Create );
        LObj.Parse(MetaData);
        obj := LObj;
        result := true;
      end;
    end;
  finally
    LSchema.Free;
  end;
end;
Autoregister attribute for Delphi
 Wouldnt it be nice if Delphi had an attribute that would automatically register your classes? So instead of having to manually call Registerclass() you just decorate the class with an attribute and it’s automatically registered. No messing about with rouge procedure calls in the initialize section, just pretty and neat class declarations as far as the eye can see.
Well, I think that would be a good idea. And after searching for such a class without finding it (which is a bit odd since it’s such an obvious candidate for automation) – I decided to make one.
Now if you are expecting a huge unit with super-duper advanced code, I’m afraid I must disappoint you. This class is about elegance, grace and usefulness. It may be a humble class in the great scheme of things, but as is often the case in life, the simplest things can be of greatest value.
I find it very useful and I hope you find it equally helpful in your projects.
unit AutoRegister;

interface

uses
System.Rtti, System.TypInfo, System.Sysutils, System.Classes;

type

// Our fancy shmancy attribute
TAutoRegister = class(TCustomAttribute)
end;

implementation

// This procedure walks through all classtypes and isolates
// those with our TAutoRegister attribute.
// It then locates the actual classtype and registeres it
// with Delphi's persistance layer
procedure ProcessAutoRegisterAttributes;
var
  ctx : TRttiContext;
  typ : TRttiType;
  attr : TCustomAttribute;
  LRealType: TClass;
  LAccess: PTypeData;
begin
  ctx := TRttiContext.Create();
  try
    for typ in ctx.GetTypes() do
    begin
      if typ.TypeKind = tkClass then
      begin
        for attr in typ.GetAttributes() do
        begin
          if attr is TAutoRegister then
          begin
            LAccess := GetTypeData(typ.Handle);
            if LAccess <> nil then
            begin
              LRealType := LAccess^.ClassType;
              if LRealType <> nil then
              begin
                if LRealType.InheritsFrom(TPersistent)
                or LRealType.InheritsFrom(TInterfacedPersistent) then
                begin
                  RegisterClass( TPersistentClass(LRealType) );
                end;
              end;
              break;
            end;
          end;
        end;
      end;
    end;
  finally
    ctx.Free();
  end;
end;

// We want to register all the classes decorated with our little
// attribute when this unit is loaded into memory
Initialization
begin
  ProcessAutoRegisterAttributes;
end;

end.
That’s basically it. Now to use the attribute just save out the unit and include it as you would any other (just add it to the uses-clause where you need it). Then decorate the classes you want registered automatically.
Remember that only classes that inherit from TPersistent (which includes TInterfacedPersistent) can be registered.
uses AutoRegister;

type
  [TAutoRegister]
  TMyClass = class(TPeristent)
  end;

  [TAutoRegister]
  TMyCoolClass = class(TInterfacedPersistent)
  end;
And voila, no more Registerclass() calls at the bottom of your units. Just neat, clean object oriented code -and as a bonus: I find it easier to read as well.
Cheers!
Ghost of xmas past, or better known as the folder where old projects and abandoned ideas end up
I think everyone has a folder where they stuff old units, test projects and well – all those ideas that seemed awesome at the time, but you either discovered that it was crap, not enough time, or just forgot all about it. It happens. What can I say.
Yeah, I have one of those as well. And I also have those duplicate folders. You know, that time when you decided to make backups for everything – but then you got a new PC and now you dont have a clue which version to keep? And when you finally sit down with beyondcompare to get this sorted, you have managed to add to both copies.
Well, needless to say I had a day I just went apeshit about a year ago and sorted everything. And whatever did not fit into my neat new code-folder(s) was mercilessly stuffed into the dark, obscure folder known only as “stuff” or “misc”.
My first basic compiler, awwwww how cute
Well its not all rubbish! I did find a special version of my kitchen-sink research IDE, the IDE I use when trying out new code for DWScript, PaxCompiler and FreePascal. I think it has 4 compilers in it or something, yet its under 30 megabytes in size! Pretty neat 🙂
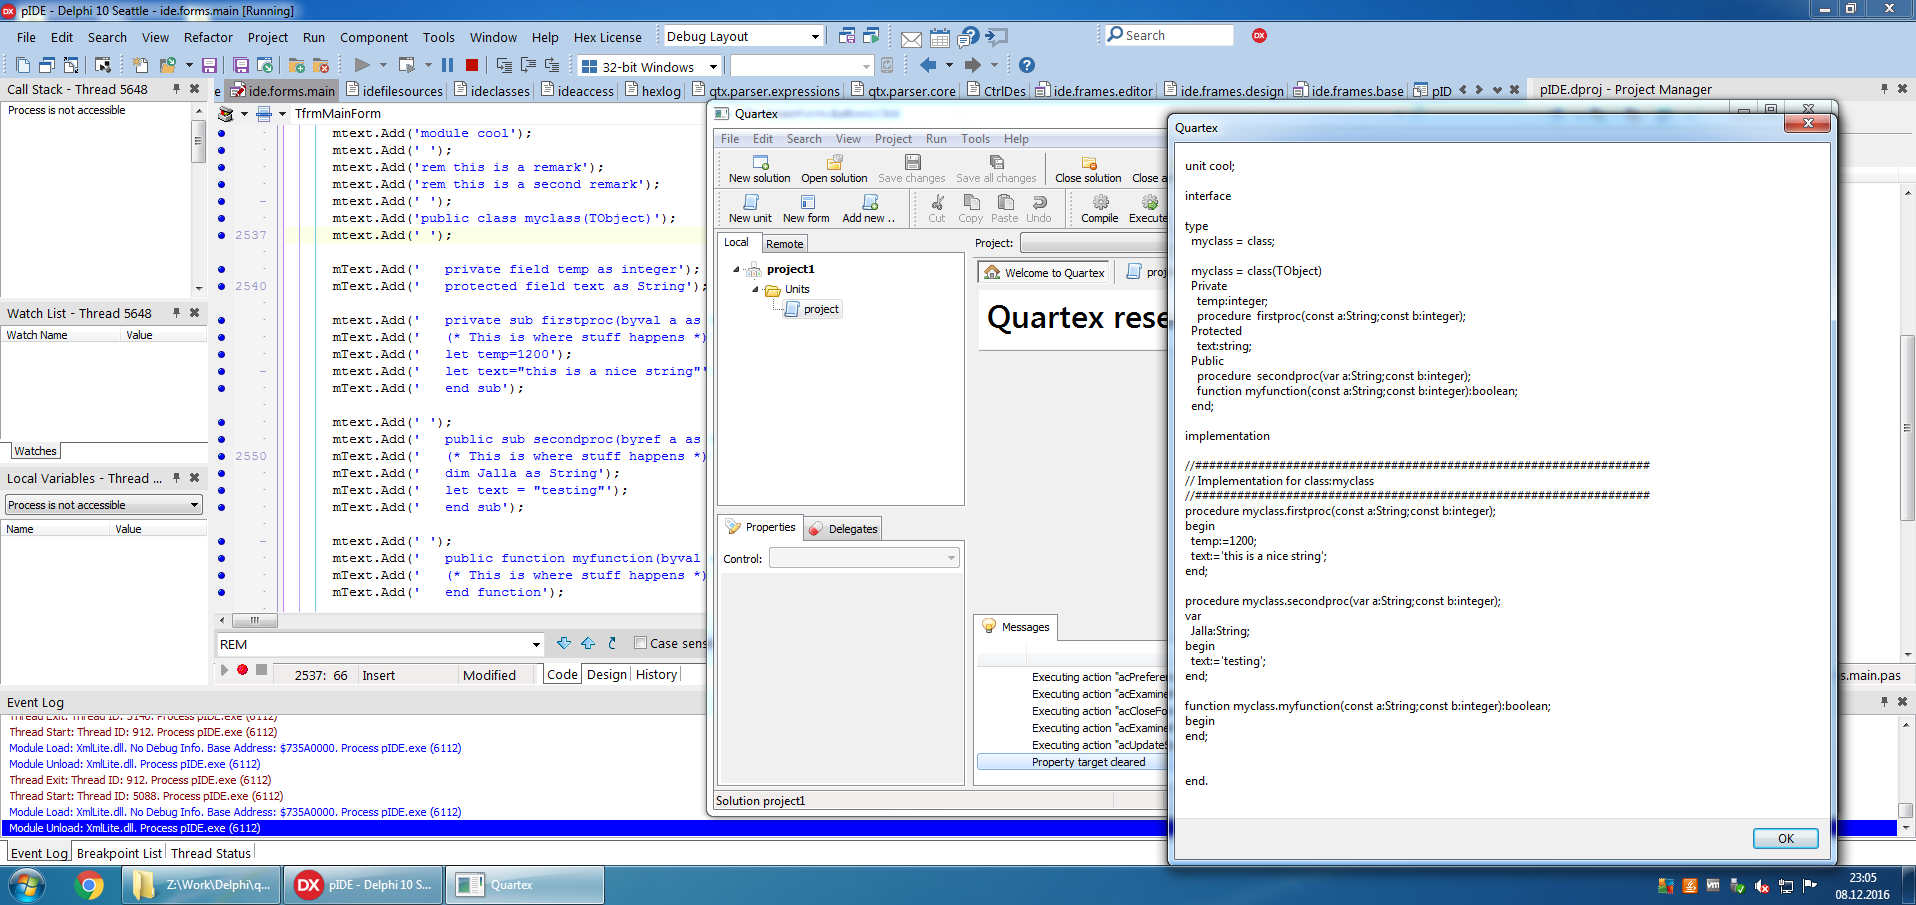
Visual Basic to Smart Pascal, awww…. just want to snuggle it 🙂
It also features a unified file-system! You can mount packages, FTP folders, network paths or local folders – the IDE could not care less, it is completely abstracted from the actual filesystem and relates only to symbols and identifiers. The actual storage is dealt with by the filesource classes.

Package, ftp, socket, local folder – the IDE could not care less
The Basic dialect here is essentially classical Visual Basic. The way you would write classes and deal with instances before dot net came along and forced all languages to look the same. I kinda like old visual basic, it had soul. It was completely useless except for scripting, and Delphi made it look like a joke – but as far as basic dialects go, it’s probably one of the cleanest and easiest to read.

DWScript, QTX Pascal (a custom fork of DWScript with a lot of cool features, some that Eric has added afterwards), Basic – and even freepascal! Thats the mother of all kitchen sinks!
The loss of QTX Pascal is a bit sad. I spent a couple of months doing my own fork of DWScript. Most of the features I added have now been included (although in another form) by Eric. But the codegen produced faster javascript. One of the things I spent some time on was optimization. Like getting rid of “variable = 0” type initialization if an assignment followed. I also added BeforeDestruction() and AfterConstruction() calls. This made an RTL a lot easier to write, but also more overhead. I was about to do conditional testing (so these would only be called if you actually used them) when I had to stop and work on Smart Mobile Studio again.
N++, exotic and functional!
This was one of my favorite language research projects. And dare I say, it is way ahead of it’s time. The idea is simple: with the future of computing being distributed, cloud based and powered by a multitude of computing modules from the US to South Africa — what would a programming language look like if built for 100% asyncronous, distributed execution?
Consider for instance, the execution of a procedure. Simple right? Well, in a truly distributed system – that procedure could execute anywhere. The whole point here is to utilize the combined power of each module (pc); which means a tasks could execute on different computers. A procedure could also be split up by the runtime environment and once again, be executed all over the place – with the dispatcher keeping track of when it’s done and whatever the result was (if any).
Only a spesific and generated on-demand “runtime context” would follow the task. This would contain things like variables it needs to execute, public symbols, basicaly just enough for the code to run successfully. This also includes resource forks (a term i used for accessing resources regardless of where they may be on the network).
The language design was actually done using Smart Mobile Studio (you can read more about the initial ideas here), and the first test modules ran on node.js (so no fancy graphics available sadly).
But it was incredibly fun to play with! But also time consuming to design a language for an execution model that havent really been invented yet. You can read more about some of my ideas for the execution model here.
I dont even think this execution model is out of the MIT labs yet — but it will once quantum compute models become commercially available (click here for a Berkley University published introduction to the basic computational models used in quantum information theory).
An N++ procedure (actually a microservice that consumed a WSDL service and calls it) looks like this:
program("service_test") {

  handshake {

    input {
      /* Consume WSDL Web-Service Endpoint */
      service1 @ service[URI:"http://www.test.com/SOAP/myService/WSDL/",
                 serviceType:SoapService];
    }

    output {
        myProcess @ process("self");
        stdio @ pipe("stdout");
      }
  }

  /* Execute RPC call */
  execute (stdio,service1)  {
    stdio:writeln("Calling webservice");
    execute (*)  {
      var int32 result = 0;
      set result = service1:getUserId("quartex","secret");
      stdio:writelnF("UserID on server={0}", result);
    } fail (e) {
      stdio.writelnF("Calling soap service failed: {0}",e);
      proceed;
    }
  }

  /* Exit code for process */
  set myProcess:exitCode = 0;
}
RML, Reduced markup language parser and runtime
Dont you just hate it when you lose the source-file for a programming language you made in a day, so now you dont have a clue what the syntax really was? I know, I know, but I honestly dont have the syntax or examples. It does with a disk ages ago.
RML was written to simplify generating HTML documents. There are a few things that you can optimize when it comes to HTML. First of all you know that the browser will read the document from top and downwards. This might not mean much at first glance, but it actually means that a language doesnt need the abillity to call emitter-code that has already executed (above). Think of it as being able to omit calls to procedure behind you in the source. That would be a mess for a language like delphi – but it doesnt impact a language that execute linear without any forms of jumps!
I seem to remember it looked something like this:
createobject(TRMLObject)
{
   writestr("testing");
   if(a=12)
   {
       readstr("mer testing");
   }
}
createobject(TRMLHeading)
{
   settitle("testing second object");
   if(a=12)
   {
       writestr("heading object successfully done");
   }
}
createobject(TRMLObject)
{
   writestr("testing third object");
   if(a=12)
   {
       readstr("mer testing from da third object");
   }
}
The idea is ofcourse that you have some pre-defined objects, a bit like custom-controls in Smart Pascal, and you create and populate these in a top-down fashion.
Once defined, generating quite advanced HTML documents can be done extremely fast. Much faster than ASP, DWS or php since no jumps are involved.
Here is how you compile and run a small debug session (drop a memo and button on a form first):
  var
    FContext: TRMLParseContext;
    FText:  String;
  begin
    FText:= 'createobject(TRMLObject)'
    +       '{'
    +       '   writestr("testing");'
    +       '   if(a=12)'
    +       '   {'
    +       '       readstr("mer testing");'
    +       '   }'
    +       '}'
    +       'createobject(TRMLHeading)'
    +       '{'
    +       '   settitle("testing second object");'
    +       '   if(a=12)'
    +       '   {'
    +       '       writestr("heading object successfully done");'
    +       '   }'
    +       '}'
    +       'createobject(TRMLObject)'
    +       '{'
    +       '   writestr("testing third object");'
    +       '   if(a=12)'
    +       '   {'
    +       '       readstr("mer testing from da third object");'
    +       '   }'
    +       '}';

    // double the code, just to get some payload
    FText := FText + FText;

    memo1.text:='';

    If RMLAllocContext(FContext,FText,[TRMLObject,TRMLHeading]) then
    Begin
      try
        if RMLCompile(FContext) then
        Begin
          caption:='Compilation was a success';
          If RMLExecute(FContext) then
          Begin
            Caption:='Executed successfully';
            memo1.text:=FContext.pcOutput;
          end;
        end else
        caption:=Format('compilation failed [%s]',[FContext.pcError]);
      finally
        RMLDisposeContext(FContext);
      end;
    end;
And here is the full code for the parser and runtime (still a few tidbits to work on, but its childs play). If you can make sense of it, knock yourself out 🙂
unit rml;
interface
uses sysutils, classes, dialogs;
type
TRMLObject = Class;
TRMLClass = Class of TRMLObject;
TRMLOperator = (opLess,opMore,opEquals,opNotEquals);
TRMLDataType = (daString,daNumber,daBoolean,daCustom);
TRMLEntryType = (etAssignment,etMethod,etRepeat,etCreate,etIf);
TRMLObjProc = Function (Const EntryData:Pointer):Boolean of Object;
(* represents a single condition in an IF statement *)
PRMLCondition = ^TRMLCondition;
TRMLCondition = Packed Record
coSource: String;
coTarget: String;
coOperator: TRMLOperator;
End;
(* represents a parsed code declaration *)
PRMLEntryDeclaration = ^TRMLEntryDeclaration;
TRMLEntryDeclaration = Packed Record
cxToken: String;
cxCondition: String;
End;
(* represents a compiled parameter *)
PRMLParameter = ^TRMLParameter;
TRMLParameter = Packed Record
prType: TRMLDataType;
prValue: Pointer;
prSize: Integer;
End;
(* represents a compiled code entry *)
PRMLEntryData = ^TRMLEntryData;
TRMLEntryData = Packed Record
edtype: TRMLEntryType;
edDeclaration: TRMLEntryDeclaration;
edObject: TRMLObject;
edParent: PRMLEntryData;
edMethod: TRMLObjProc;
edContext: Pointer;
edConditions: Array of PRMLCondition;
edParameters: Array of PRMLParameter;
edSubEntries: Array of PRMLEntryData;
End;
PRMLParseContext = ^TRMLParseContext;
TRMLParseContext = Packed Record
pcSignature: Integer;
pcCol: Integer;
pcRow: Integer;
pcPos: Integer;
pcLen: Integer;
pcData: String;
pcError: String;
pcOutput: String;
pcRoot: TRMLEntryData;
pcClasses: Array of TRMLClass;
End;
TRMLReadProc = Function (Var OutData;var Bytes:Integer):Boolean of Object;
TRMLWriteProc = Function (Var InData;Const Bytes:Integer):Boolean of Object;
TRMLProcEntry = Function (Const Entry:PRMLEntryData):Boolean of Object;
PRMLObjectIndex = ^TRMLObjectIndex;
TRMLObjectIndex = Packed Record
oiMethods: Array of record
omName: String;
omSyntax: Array of TRMLDataType;
omEntry: TRMLProcEntry;
end;
oiProperties: Array of record
oiName: String;
oiRead: TRMLReadProc;
oiWrite: TRMLWriteProc;
oiType: TRMLDataType;
end;
End;
TRMLObject = Class(TObject)
Private
FIndexData: TRMLObjectIndex;
FIndexPTR: PRMLObjectIndex;
Private
Function DoWriteStr(Const Entry:PRMLEntryData):Boolean;
Function DoReadStr(Const Entry:PRMLEntryData):Boolean;
protected
Procedure Output(Const Context:PRMLParseContext;Const Value:String);
Procedure RegisterProperty(Const Name:String;Const DataType:TRMLDataType;
Const _Read:TRMLReadProc;Const _Write:TRMLWriteProc);
Procedure RegisterMethod(Const Name:String;
Const Syntax: Array of TRMLDataType;
Const Entry: TRMLProcEntry);
Public
Property ObjectIndex:PRMLObjectIndex read FIndexPTR;
Constructor Create;virtual;
End;
TRMLHeading = Class(TRMLObject)
Private
FTitle: String;
Function DoSetTitle(Const Entry:PRMLEntryData):Boolean;
Function DoReadTitle(Var OutData;var Bytes:Integer):Boolean;
Function DoWriteTitle(Var InData;Const Bytes:Integer):Boolean;
Public
property Title:String read FTitle write FTitle;
Constructor Create;override;
End;
Function RMLAllocContext(var Context:TRMLParseContext;
Const Source:String;Const ClsBase:Array of TRMLClass):Boolean;
Function RMLDisposeContext(Var Context:TRMLParseContext):Boolean;
Function RMLCompile(Var Context:TRMLParseContext):Boolean;
Function RMLExecute(Const Context:TRMLParseContext):Boolean;
Function RMLParseEntry(Value:String;
var Declaration:TRMLEntryDeclaration;var Error:String):Boolean;
implementation
//###########################################################################
// TRMLHeading
//###########################################################################
Constructor TRMLHeading.Create;
Begin
inherited;
RegisterMethod('settitle',[daString],DoSetTitle);
RegisterProperty('title',daString,DoReadTitle,DoWriteTitle);
end;
Function TRMLHeading.DoSetTitle(Const Entry:PRMLEntryData):Boolean;
var
FTemp: String;
Begin
result:=length(Entry^.edParameters)>0;
If result and (Entry^.edParameters[0].prType=daString) then
DoWriteTitle(Entry^.edParameters[0].prValue^,
Entry^.edParameters[0].prSize);
end;
Function TRMLHeading.DoReadTitle(Var OutData;var Bytes:Integer):Boolean;
Begin
Bytes:=Length(FTitle);
If Bytes>0 then
move(FTitle[1],outData,Bytes);
end;
Function TRMLHeading.DoWriteTitle(Var InData;Const Bytes:Integer):Boolean;
Begin
SetLength(FTitle,bytes);
if Bytes>0 then
move(inData,FTitle[1],Bytes);
end;
//###########################################################################
// TRMLObject
//###########################################################################
Constructor TRMLObject.Create;
begin
inherited;
FIndexPTR:=@FIndexData;
RegisterMethod('writestr',[daString],DoWriteStr);
RegisterMethod('readstr',[daString],DoReadStr);
end;
Procedure TRMLObject.Output(Const Context:PRMLParseContext;
Const Value:String);
Begin
Context^.pcOutput:=Context^.pcOutput + Value;
end;
Function TRMLObject.DoReadStr(Const Entry:PRMLEntryData):Boolean;
var
FText: String;
Begin
result:=True;
With Entry^ do
Begin
FText:='Token: ' + edDeclaration.cxToken + #13#10;
FText:=FText + 'Condition: ' + edDeclaration.cxCondition + #13#10;
FText:=FText + #13#10;
Output(edContext,FText);
end;
end;
Function TRMLObject.DoWriteStr(Const Entry:PRMLEntryData):Boolean;
var
FText: String;
Begin
result:=True;
With Entry^ do
Begin
FText:='Token: ' + edDeclaration.cxToken + #13#10;
FText:=FText + 'Condition: ' + edDeclaration.cxCondition + #13#10;
FText:=FText + #13#10;
Output(edContext,FText);
end;
end;
Procedure TRMLObject.RegisterProperty(Const Name:String;
Const DataType:TRMLDataType;
Const _Read:TRMLReadProc;Const _Write:TRMLWriteProc);
var
FCount: Integer;
Begin
//FCount:=high(FIndexData.oiProperties) - Low(FIndexData.oiProperties) + 1;
FCount:=Length(FIndexData.oiProperties);
SetLength(FIndexData.oiProperties,FCount+1);
FIndexData.oiProperties[FCount].oiName:=Name;
FIndexData.oiProperties[FCount].oiRead:=_Read;
FIndexData.oiProperties[FCount].oiWrite:=_Write;
FIndexData.oiProperties[FCount].oiType:=DataType;
end;
Procedure TRMLObject.RegisterMethod(Const Name:String;
Const Syntax: Array of TRMLDataType;
Const Entry: TRMLProcEntry);
var
FCount: Integer;
FTemp: Integer;
Begin
//FCount:=high(FIndexData.oiMethods) - Low(FIndexData.oiMethods) + 1;
FCount:=Length(FIndexData.oiMethods);
SetLength(FIndexData.oiMethods,FCount+1);
FIndexData.oiMethods[FCount].omName:=Name;
FIndexData.oiMethods[FCount].omEntry:=Entry;
//FTemp:=high(Syntax) - Low(Syntax) + 1;
FTemp:=Length(Syntax);
If FTemp>0 then
Begin
SetLength(FIndexData.oiMethods[FCount].omSyntax,FTemp);
for FTemp:=low(syntax) to high(syntax) do
FIndexData.oiMethods[FCount].omSyntax[FTemp]:=Syntax[FTemp];
end;
end;
//###########################################################################
// RML util methods
//###########################################################################
Function RMLContainChars(Const Value:String;const Chars:String):Boolean;
var
x: Integer;
Begin
result:=True;
for x:=1 to length(chars) do
Begin
if pos(chars[x],Value)<1 then
Begin
result:=False;
Break;
end;
end;
end;
Function RMLScanFor(const Value:String;Const Target:CHAR;
Const Breakers:String;var Len:Integer):Boolean;
var
xpos: Integer;
Begin
result:=False;
Len:=-1;
xpos:=1;
while xpos<=Length(Value) do Begin If Value[xpos]=Target then Begin Len:=xpos-1; Result:=True; Break; end else Begin if pos(Value[xpos],Breakers)>0 then
Break;
end;
inc(xpos);
end;
end;
Function RMLisNumber(Const Value:String):Boolean;
const
CHARSET = '0123456789';
var
x: Integer;
Begin
Result:=True;
for x:=1 to length(Value) do
Begin
if pos(Value[x],CHARSET)<1 then
Begin
result:=False;
Break;
end;
end;
end;
Function RMLIsBoolean(Const Value:String):Boolean;
var
FTemp: String;
Begin
FTemp:=lowercase(trim(Value));
result:=(FTemp='false') or (FTemp='true');
end;
Function RMLisString(Const Value:String):Boolean;
var
x: Integer;
FLeft: Integer;
Begin
result:=False;
FLeft:=0;
(* check left side *)
for x:=1 to length(Value) do
Begin
if Value[x]='"' then
Begin
FLeft:=x;
Result:=True;
Break;
end else
if Value[x]<>#32 then
Break;
end;
(* check right side *)
If result then
Begin
for x:=Length(Value) downto 1 do
Begin
if Value[x]='"' then
Begin
If x>FLeft then
Break else
Begin
Result:=False;
Break;
end;
end else
if Value[x]<>#32 then
Break;
end;
end;
end;
Function RMLParseEntry(Value:String;
var Declaration:TRMLEntryDeclaration;
var Error:String):Boolean;
var
xpos: Integer;
Begin
fillchar(Declaration,SizeOf(Declaration),0);
Result:=RMLContainChars(value,'()');
if Result then
Begin
Result:=RMLScanFor(value,'(',')',xpos);
if result then
Begin
Declaration.cxToken:=trim(copy(value,1,xpos));
delete(value,1,xpos+1);
Result:=RMLScanFor(value,')','(',xpos);
if result then
Begin
Value:=TrimRight(Value);
Result:=xpos=(length(value)-1);
if result then
Declaration.cxCondition:=trim(Copy(Value,1,xpos));
end;
end;
end;
If not Result then
Error:='Invalid entry <' + value + '>';
end;
Function RMLAllocContext(var Context:TRMLParseContext;
Const Source:String;Const ClsBase:Array of TRMLClass):Boolean;
var
FCount: Integer;
Begin
If Context.pcSignature=SizeOf(Context) then
RMLDisposeContext(Context);
fillchar(Context,SizeOf(Context),#0);
Context.pcSignature:=SizeOf(Context);
Context.pcLen:=Length(Source);
Context.pcData:=Source;
FCount:=High(clsBase) - low(clsBase)+1;
If FCount>0 then
Begin
SetLength(Context.pcClasses,FCount);
for FCount:=Low(clsBase) to high(clsBase) do
Context.pcClasses[FCount]:=clsBase[FCount];
end;
result:=True;
end;
Procedure RMLDisposeEntryData(Const Data:PRMLEntryData);
var
FTemp: Integer;
x: Integer;
Begin
(* dispose of condition data *)
FTemp:=length(Data^.edConditions);
While FTemp>0 do
Begin
Dispose(Data^.edConditions[FTemp-1]);
dec(FTemp);
end;
SetLength(Data^.edConditions,0);
(* dispose of parameter data *)
FTemp:=length(Data^.edParameters);
While FTemp>0 do
Begin
If length(Data^.edParameters)>0 then
Begin
for x:=Low(Data^.edParameters) to high(Data^.edParameters) do
If Data^.edParameters[x]^.prSize>0 then
FreeMem(Data^.edParameters[x]^.prValue);
end;
Dispose(Data^.edParameters[FTemp-1]);
dec(FTemp);
end;
SetLength(Data^.edParameters,0);
(* dispose of sub entries *)
//Ftemp:=High(Data^.edSubEntries)-Low(Data^.edSubEntries)+1;
FTemp:=Length(Data^.edSubEntries);
While FTemp>0 do
Begin
RMLDisposeEntryData(Data^.edSubEntries[FTemp-1]);
Dec(FTemp);
end;
SetLength(Data^.edSubEntries,0);
(* dispose of script object *)
If not (Data^.edtype in [etIf,etRepeat,etMethod])
and (Data^.edObject<>NIL) then
Data^.edObject.free;
(* dispose of entry *)
Dispose(Data);
end;
Function RMLDisposeContext(Var Context:TRMLParseContext):Boolean;
var
FCount: Integer;
Begin
Result:=Context.pcSignature=SizeOf(Context);
If Result then
Begin
Context.pcSignature:=0;
Context.pcData:='';
Context.pcError:='';
FCount:=Length(Context.pcRoot.edSubEntries);
//FCount:=High(Context.pcRoot.edSubEntries)
//- Low(Context.pcRoot.edSubEntries) + 1;
While FCount>0 do
Begin
RMLDisposeEntryData(Context.pcRoot.edSubEntries[FCount-1]);
dec(FCount);
end;
SetLength(Context.pcRoot.edSubEntries,0);
end;
end;
//###########################################################################
// RML core methods
//###########################################################################
Function RMLImplements(Const MethodName:String;
Const obj:TRMLObject):Boolean;
var
FTable: PRMLObjectIndex;
FCount: Integer;
Begin
Result:=Obj<>NIL;
If result then
Begin
(* get object inex *)
FTable:=Obj.ObjectIndex;
//FCount:=High(FTable^.oiMethods) - low(FTable^.oiMethods) + 1;
FCount:=Length(FTable^.oiMethods);
Result:=FCount>0;
If Result then
Begin
for FCount:=low(FTable^.oiMethods) to high(FTable^.oiMethods) do
Begin
Result:=FTable^.oiMethods[FCount].omName=MethodName;
If Result then
Break;
end;
end;
end;
end;
Function RMLGetMethodEntry(Const MethodName:String;
Const obj:TRMLObject;var outEntry:TRMLObjProc):Boolean;
var
FTable: PRMLObjectIndex;
FCount: Integer;
Begin
Result:=Obj<>NIL;
If result then
Begin
(* get object inex *)
FTable:=Obj.ObjectIndex;
//FCount:=High(FTable^.oiMethods) - low(FTable^.oiMethods) + 1;
FCount:=Length(FTable^.oiMethods);
Result:=FCount>0;
If Result then
Begin
for FCount:=low(FTable^.oiMethods) to high(FTable^.oiMethods) do
Begin
Result:=FTable^.oiMethods[FCount].omName=MethodName;
If Result then
Begin
outEntry:=TRMLObjProc(FTable^.oiMethods[FCount].omEntry);
Break;
end;
end;
end;
end;
end;
Function RMLCreateObject(var Context:TRMLParseContext;
Const Objname:String;var outObject:TRMLObject;
var Error:String):Boolean;
var
FCount: Integer;
Begin
FCount:=High(Context.pcClasses) - Low(Context.pcClasses) + 1;
Result:=FCount>0;
if Result then
Begin
For FCount:=Low(Context.pcClasses) to high(Context.pcClasses) do
Begin
Result:=lowercase(Context.pcClasses[FCount].ClassName)=lowercase(objName);
If result then
Begin
outObject:=Context.pcClasses[FCount].Create;
Break;
end;
end;
end;
If not Result then
Error:='Unknown class <' + Objname + '>';
end;
Function RMLAddEntry(var Context:TRMLParseContext;
Var Declaration:TRMLEntryDeclaration;
Root:PRMLEntryData;var NewEntry:PRMLEntryData;
var Error:String):Boolean;
var
FCount: Integer;
x: Integer;
FTemp: String;
FLen: Integer;
FPar: PRMLParameter;
Begin
Result:=Root<>NIL;
If result then
Begin
(* create new entry *)
new(NewEntry);
(* Reset entry record *)
NewEntry^.edType:=etAssignment;
NewEntry^.edObject:=NIL;
NewEntry^.edMethod:=NIL;
SetLength(NewEntry^.edConditions,0);
SetLength(NewEntry^.edParameters,0);
SetLength(NewEntry^.edSubEntries,0);
(* Set basic values *)
NewEntry^.edParent:=Root;
NewEntry^.edContext:=@Context;
newEntry^.edDeclaration:=Declaration;
(* insert entry into parent *)
FCount:=Length(Root^.edSubEntries);
SetLength(Root^.edSubEntries,FCount+1);
Root^.edSubEntries[FCount]:=NewEntry;
(* tokenize *)
If declaration.cxToken='createobject' then
Begin
NewEntry^.edtype:=etCreate;
Result:=RMLCreateObject
(
Context,declaration.cxCondition,
NewEntry^.edObject,Error
);
end else
if declaration.cxToken='if' then
Begin
NewEntry^.edtype:=etIF;
NewEntry^.edObject:=NewEntry^.edParent.edObject;
end else
if declaration.cxToken='repeat' then
NewEntry^.edtype:=etRepeat else
Begin
(* method call? Make sure entry object supports this *)
Result:=NewEntry^.edParent.edObject<>NIL;
If Result then
Begin
(* check if object supports the method name *)
Result:=RMLImplements(declaration.cxToken,NewEntry^.edParent.edObject);
If Result then
Begin
(* Query object for method entry *)
Result:=RMLGetMethodEntry
(
declaration.cxToken,
NewEntry^.edParent.edObject,
NewEntry^.edMethod
);
If result then
Begin
NewEntry^.edtype:=etMethod;
NewEntry^.edObject:=NewEntry^.edParent.edObject;
(* now parse the parameter conditions *)
x:=0;
While x<Length(declaration.cxCondition) do Begin inc(x); If (declaration.cxCondition[x]=',') or (x=Length(declaration.cxCondition)) then Begin If x=Length(declaration.cxCondition) then FTemp:=FTemp + declaration.cxCondition[x]; FTemp:=trim(FTemp); If length(FTemp)>0 then
Begin
(* create a new parameter *)
FLen:=length(NewEntry^.edParameters);
setlength(NewEntry^.edParameters,FLen+1);
New(FPar);
If RMLIsString(FTemp) then
FPar^.prType:=daString else
if RMLIsNumber(FTemp) then
FPar^.prType:=daNumber else
if RMLIsBoolean(FTemp) then
FPar^.prType:=daBoolean else
FPar^.prType:=daCustom;
Case FPar^.prType of
daString:
Begin
Delete(FTemp,1,1);
Delete(FTemp,length(FTemp),1);
FPar^.prSize:=Length(FTemp);
FPar^.prValue:=AllocMem(FPar^.prSize);
move(FTemp[1],FPar^.prValue^,FPar^.prSize);
end;
daNumber:
Begin
FPar^.prSize:=SizeOf(Integer);
FPar^.prValue:=AllocMem(FPar^.prSize);
PInteger(FPar^.prValue)^:=StrToInt(FTemp);
end;
daBoolean:
Begin
end;
daCustom:
Begin
end;
end;
NewEntry^.edParameters[FLen]:=FPar;
FTemp:='';
end else
Begin
//Invalid parameter error
end;
end else
FTemp:=FTemp + declaration.cxCondition[x]
end;
{
Validate parameter datatypes here!
If (Length(NewEntry^.edParameters)>0) then
Begin
for x:=Low(NewEntry^.edParameters) to
high(NewEntry^.edParameters) do
Begin
newEntry^.edObject.
end;
end; }
end;
end else
Begin
// property assignment test here
end;
end;
end;
(* Failed to tokenize? *)
If not Result then
Begin
(* dispose of entry data *)
Dispose(NewEntry);
NewEntry:=NIL;
SetLength(Root^.edSubEntries,FCount);
Context.pcError:=Format('Invalid token "%s"',[declaration.cxToken]);
end;
end else
Error:='AddEntry failed, root can not be NIL';
end;
Function RMLParseObject(Var Context:TRMLParseContext;
Const Root:PRMLEntryData):Boolean;
var
FChar: Char;
FTemp: String;
FDeclaration: TRMLEntryDeclaration;
FNewEntry: PRMLEntryData;
Begin
Result:=Context.pcSignature=SizeOf(Context);
If result then
Begin
(* update cursor *)
inc(Context.pcPos);
inc(Context.pcCol);
while Result and (Context.pcPos<Context.pcLen) do
Begin
FChar:=Context.pcData[Context.pcPos];
Case FCHAR of
#13:
Begin
inc(Context.pcRow);
inc(Context.pcPos);
Context.pcCol:=0;
Continue;
end;
';':
Begin
Result:=RMLParseEntry(trim(FTemp),FDeclaration,Context.pcError);
If result then
Result:=RMLAddEntry
(
Context,
FDeclaration,
root,
FNewEntry,
Context.pcError
);
If Result then
Begin
inc(Context.pcPos);
inc(Context.pcCol);
If FNewEntry^.edtype=etIF then
Result:=RMLParseObject(Context,FNewEntry);
end;
FTemp:='';
end;
'{':
Begin
Result:=RMLParseEntry(FTemp,FDeclaration,Context.pcError);
If Result then
Begin
Result:=FDeclaration.cxToken='if';
If result then
Begin
Result:=RMLAddEntry
(
Context,
FDeclaration,
Root,
FNewEntry,
Context.pcError
);
If Result then
Result:=RMLParseObject(Context,FNewEntry);
end;
end;
FTemp:='';
end;
'}':
Begin
inc(Context.pcCol);
inc(Context.pcPos);
Break;
end;
else
Begin
FTemp:=FTemp + FChar;
inc(Context.pcCol);
inc(Context.pcPos);
end;
end;
end;
end;
end;
Function RMLExecute(Const Context:TRMLParseContext):Boolean;
Function RunEntry(Const Item:PRMLEntryData):Boolean;
var
FSubCount: Integer;
x: Integer;
Begin
result:=True;
Case Item^.edtype of
etCreate,
etAssignment:
Begin
FSubCount:=Length(Item^.edSubEntries);
for x:=1 to FSubCount do
Begin
result:=RunEntry(Item^.edSubEntries[x-1]);
If not result then
break;
end;
end;
etMethod:
Begin
{result:=RMLGetMethodEntry(Item^.edDeclaration.cxToken,
Item^.edObject,FEntry);
If result then
result:=FEntry(Item); }
Result:=TRMLProcEntry(Item^.edMethod)(Item);
end;
etRepeat:
Begin
//FSubCount:=Length(Item^.edSubEntries);
end;
etIf:
Begin
FSubCount:=Length(Item^.edSubEntries);
for x:=1 to FSubCount do
RunEntry(Item^.edSubEntries[x-1]);
end;
end;
End;
Begin
Result:=Context.pcSignature=SizeOf(Context);
If result then
Begin
result:=length(Context.pcError)<1;
If result then
result:=RunEntry(@Context.pcRoot);
end;
end;
Function RMLCompile(Var Context:TRMLParseContext):Boolean;
var
FChar: Char;
FTemp: String;
FDeclaration: TRMLEntryDeclaration;
FNewEntry: PRMLEntryData;
Begin
Result:=Context.pcSignature=SizeOf(Context);
If result then
Begin
Context.pcCol:=0;
Context.pcRow:=0;
Context.pcPos:=1;
Context.pcError:='';
while Result and (Context.pcPos<Context.pcLen) do
Begin
FChar:=Context.pcData[Context.pcPos];
Case FCHAR of
#13:
Begin
inc(Context.pcRow);
inc(Context.pcPos);
Context.pcCol:=0;
Continue;
end;
'{':
Begin
Result:=RMLParseEntry(FTemp,FDeclaration,Context.pcError);
If Result then
Begin
Result:=FDeclaration.cxToken='createobject';
If result then
Begin
Result:=RMLAddEntry
(
Context,
FDeclaration,
@Context.pcRoot,
FNewEntry,
Context.pcError
);
If Result then
Result:=RMLParseObject(Context,FNewEntry);
end;
end;
FTemp:='';
end;
'}':
Begin
end;
else
Begin
FTemp:=FTemp + FChar;
inc(Context.pcCol);
inc(Context.pcPos);
end;
end;
end;
end;
end;
end.
Goodbye G+ Delphi Developers group

This is from the deleted post. If you look at the picture you will notice a Delphi UDP client/server on the right talking with a node.js service on the left. Aparently this is not Delphi enough for the admin in charge of the Delphi group on G+
Looking into the actual data, with JavaScript leading and JavaScript libraries on client and server side (Angular.js, Node.js) on the rise, it was nice to see that while Delphi was not listed as an option, it was the most typed entry in the “others” category -Source: Marco Cantu
- Smart Mobile Studio is written 100% in Delphi
- Smart Mobile Studio was created from scratch to compliment Delphi
- Smart Mobile Studio supports Remobjects SDK out of the box
- Smart Mobile Studio supports Embarcadero Datasnap out of the box
- Smart Mobile Studio helps Delphi developers write the middleware or interfacing that sits between a native Delphi solutions and a customer’s node.js or purely web-based solution. This is 2016 after all.
- Where a Delphi developer would previously have to decline a job offering because the customer’s existing infrastructure is based on node or emits data unsuitable for traditional Delphi components, developers can now relax and write the missing pieces in a Smart pascal, a dialect roughly 90% compatible with the language they know and love to begin with.
- Smart Mobile Studio ships with a wast RTL that greatly simplify talking with Delphi. It also has a VCL inspired component hierarchy where more and more complex behavior is introduced vertically. This gives your codebase a depth which is very hard to achieve under vanilla JavaScript or Typescript.
- Smart Mobile Studio is all about Delphi. It is even used to teach programming in the UK. Teenagers who by consequence and association is statistically more likely to buy Delphi as they mature.
- Decline the project
- Learn JavaScript or Typescript and do battle with its absurd idiosyncrasies, lack of familiar data types, lack of inheritance and lack of everything you are used to
- Use Smart Mobile Studio to write the middleware between your native solution and the customer existing infrastructure
If you pick option number two, it wont take many days before you realize just how alien JavaScript is compared to Delphi or C++ builder. And you will consequently start to understand the value of our RTL which is written to deal with anything from low-level coding (allocmem, reallocmem, fillmemory, move, buffers, direct memory access, streams and even threading). Our RTL is written to make the JavaScript virtual machine palatable to Delphi developers.
Banning dialects?
Once you start banning dialects of a language or an auxiliary utillity designed to empower Delphi and make sure developers can better interface with that aspect of the marketplace – where does it stop? I am curious to where exactly the Google+ Delphi group draws the line here to be honest.
Should Remobject Oxygene likewise be banned since it helps Delphi developers target the dot net framework? That would be odd since Delphi shipped Oxygene for years.
Should script engines be banned? What about SQL? SQL is a language most Delphi developers know and use – but it is by no measure object pascal and never will be. Interestingly, Angular.js seems to be just fine for the Google+ Delphi group. Which is a bit hypocritical since that is JavaScript plain and simple.
What about report engines? Take FastReport for instance: FastReport have for the past decade or more bolted their own scripting engine into the product, a script engine that supports a subset of object pascal but also visual basic (blasphemy!). On iOS you are, if we are going to follow the Apple license agreement down to the letter, not even allowed to use FastReport. Apple is very clear on this. Any applications that embed scripting engines and at the same time download runnable code (which would be the case when downloading report files) is not allowed on appstore. The idea here is that should some code be downloaded that is harmful, well then Apple will give you a world of hurt. And even if you consider it a report-file, it does contain runnable code – and that is a violation.
So is Fastreport Delphi enough? Or is that banned as well?
Where exactly do we draw the line? I can understand banning posts about dot net if it’s all about C#, but if it’s in relation to Delphi or deals with Delphi talking with dot net (or an actual dialect like Oxygene) then I really don’t see why it could be banned or deleted. Even Delphi itself uses dot net. It’s one of the pre-requisites for installing Delphi in the first place. I guess Delphi should also be banned from the Delphi group then?
In our group on Facebook, all are welcome. Embarcadero, Lazarus and Free Pascal, Elevate software (be it their database engines or web builder), Pax compiler, DWScript, Smart Pascal, NewPascal (or whatever it’s called these days) and even Turbo Pascal for that matter. And we sure as shit dont delete posts of Delphi talking to another system.
So goodbye G+ and good luck
Smart Pascal, supported server types

Use node.js to fill your xmas with fun!
Node.js is probably one of the coolest pieces of software I have had the pleasure to work with for years. It’s platform independent and available for just about every operative system you can imagine. I would even go so far as to say it has become universal.
NodeJS allows you not only to write server-side JavaScript, but also your own system level services. This is especially easy on Linux where the philosophy regarding a service is somewhat different from Microsoft Windows. On Linux, a simple bash script can be installed as a service. You can write services in python, perl or whatever tickles your fancy.
Our latest addition: UDP
Today I had a few minutes to test the UDP implementation I finished last week, and I was for some odd reason expecting an exception or “something” to come up. You know.. when something is that easy to write, there’s typically is a catch right? Or maybe im just and old, cynical Delphi developer. Either way, it worked on the first try!
Compiled SMS (node.js) talking with a Delphi application
Now I realize that UDP is not what you use for high-end, reliable communication. But that is beside the point. I want the code you get access to in our next update to be polished, easy to use and something you can rely on. And the keyword here is “co-operation”. My personal service stack that I host in my own home is written in 4 different languages. You have Delphi and C# services running under Windows, you have Lazarus daemons on my Linux box (a full PC) and last but not least — you have Smart Pascal servers running on embedded hardware.
Our list of server types now include:
- HTTP
- TCP
- WebSocket
- UDP
I use UDP more or less as a signal trigger between processes to handle wait, ready, update and even restart. So by broadcasting a single “shutdown” signal, all my machines will gracefully stop and then power down.
So, how does an UDP server look like? It borders on ridicules how little effort it takes:
procedure TNodeService1.SetupUDPServer;
var
  Server: TNJUDPServer;
begin

Server := TNJUDPServer.Create;
Server.Port := 1881;
Server.Address := '127.0.0.1';
Server.MulticastLoopback := true;
Server.Broadcast := true;
Server.Exclusive:= false;

Server.OnMessage := procedure (Sender: TObject; Data: variant;
          RequestInfo: TNJUDPRequestInfo)
begin
  writeln("Message recieved!");
end;

Server.OnError := procedure (Sender: TObject; ErrorObj: TJsErrorObject)
begin
  writeln("Error:" + ErrorObj.message);
end;

Server.OnClose := procedure (Sender: TObject; ErrorObj: TJsErrorObject)
begin
  writeln("Server closed");
end;

Server.OnAfterServerStarted := procedure (sender: TObject)
begin
  writelnF("Server started, listening on post %d @ %s",
  [Server.port, Server.Address]);
end;

Server.Active := true;
end;
That’s pretty much it. Naturally you have to fill in the blanks, but the above code is all you have to write to create a UDP server. The cool part is that all server classes inherit from a common ancestor, so once you know how to code one – you have a leg up on using the rest of them.
Running the server as a Linux Daemon
Like all languages, node.js has a few tools that are considered standard. It’s like we Delphi developers take component’s and libraries like GR32 and SynEdit for granted. These packages have become so standard that we forget how hard it can be for beginners to get an overview of what’s available.
Turns our node.js is no different, and the tool everyone is using to run their node.js code as a dedicated background service (meaning that it will start during the boot sequence) is called PM2 or node.js process manager v2.

Running your Smart Pascal server as a system-level daemon is very easy once you know what to look for 🙂
In short, PM2 is like a watch-dog that keeps an eye on your service. If it crashed PM2 will re-started it (unless you tell it otherwise), it also does extensive logging for you – and it will even generate a startup script that you can add to the Linux (or windows) startup sequence.
But the most important aspect of PM2 is that you can easily get some “live” info on your services, like how much memory they consume, the CPU consumption and everything else. It’s also PM2 that makes it a snap to run your node.js servers in cluster mode, meaning that you can spread the workload over multiple machines and cores for better performance.
Getting PM2 up and running is easy enough. Just make sure you have installed NPM first, which is the “node package manager” front-end. To install NPM you just write:
sudo apt-get install npm -y
And with NPM available on your system, you install PM2 through NPM (PM2 is ofcourse written in node.js itself):
npm install pm2 -g
Next, having compiled our Smart Pascal project, we copy the file over to a shared folder on our raspberry PI (I installed Samba to make this easier), cd into the folder and type:
pm2 start backend/backend.js --name backend
Notice the “–name backend” part? PM2 allows you to assign names to your code. This makes it easier to manage them (not having to type the full path every single time).
To check if our service is now installed, type:
pm2 show backend
And voila! We have a live Smart Mobile Studio server running on a Raspberry PI 3! Now whip out Delphi and recycle those legacy services!

You must be logged in to post a comment.